
Capturing your dinner, a deep learning story
A naive approach to features extraction and R-CNN
Working for Smile innovation can lead to funny pre-sales research. Few weeks ago I was involved in a discussion to find out if it could be possible to recognise (and so to bill) plates and all others food items on a lunch tray.
Well, that was a challenging idea. But with the right approach and tooling I achieved to something very interesting. Let’s have a look!
Food is so complicated
Nowadays, capturing objects from images or videos is a very common task as many examples of images recognition explain how to find cars, cats, dogs, human… Google, Amazon, and many others provide API, libraries and models, and many researchers continue to give better and better algorithms, mathematical progress and ideas to enhance that activity.
So, checking if a given image is about food is easy.
But what if you have to guess what the food sitting on the table actually **is **? And what about finding every dishes, desserts, entries, bread and drink that is on the table?
In this article, you’ll see that in this particular case, this type of recognition is not so easy, why, and how I finally got to make a computer recognizing food plates.
Of course, I will speak about machine learning, convolutions, CNN, R-CNN… and OpenCV
Detecting objects is really easy, yes really
Since CNN became very accessible and easy to learn thanks to libraries as TensorFlow, Theano, Pytorch or Keras, we are able to read, study and make tests from a lot of tutorials, articles and videos. There are a lot of pre-trained models to ease the process, and I can now say that machine learning and convolutional neural networks are accessible for all.
Also, the first object recognition I’ve used was HAAR like detection from the famous OpenCV library. And if you wonder if it’s deep learning, the answer is “yes it is”. HAAR like detection uses a kind of wavelets convolution process to keep cascade file of object. The training is essentially the same as we can do with TensorFlow: give it a lot of example, let it learn, and try to detect.
OK, it’s easy. But is it working for any object… and food ?
But food is complex we said
As soon as I decided to detect plates, glasses, bottles, everything was OK. But the problems began when we started to learn what is a risotto to the model. Whatever the number of images we gave, the training tool stopped, complaining that there were not enough features. And yes, that’s right for a HAAR like detection model: we need good features.
Mainly, HAAR like detection is fast, really efficient and easy to prepare. Detection can be done in real time even on a poor CPU (see this paper for more information). But as soon as we wanted to train a cascade to detect salads, the result was very bad.
The fact is that HAAR Like detection is really efficient to detect shapes (human, cat, dog, tables, chairs…) — OpenCV provides models to find, for example, faces and eyes with real-time computation. This is very easy to use, and the train phase is not so complicated. You can achieve that with a simple photo, or via your webcam with real-time display.
But as soon as the data is very heterogeneous (as pizzas ingredients, spaghetti in a plate, meat in sauce…) the efficience falls down. We spent several hours trying to find a way to adapt our capture, but nothing was really working.
And that’s what CNN (Convolutional neural network) are able to learn without any problem as far as you are using photo where the desired detected object is the main object of the scene. And that’s not always the case. Let’s talk about “features extraction”.
The features extraction
“Basic” CNN are able to say “ok, that’s a cat” if you give an image with a cat as main object of the scene. But when you give it an image with several objects in a complexe scene containing cats, dogs, plants, and so on in a garden, so the CNN will say “ok… 3% of cat in the image, 10% dogs, maybe a pizza there (0.3%)”. Have I said there is no pizza in the garden?
You understood the problem: CNN hasn’t checked regions of the image, it watched the entire image and tried to evaluate the scene. Actually, it is right, there is actually 3% of cat in the entire image.
As the cat were not the main object, the result is not very efficient.
This is why I need a process that is named “features extraction” to find regions of interest in the image, and to be able to say “OK, there is a cat in the image, but also there is 3 dogs, 2 plants and it seems that Homer Simpson is here too but I’m not sure (0.2%)”.
To successfully accomplish that task, I had several possible techniques:
-
using R-CNN that are able to make recursion, extract features and give the list of detection with bounding boxes
-
extract features before to send them to a CNN, that is to say make what a R-CNN does, but our side.
What’s best, what is worst?
Hard choice.
Why not try both approches, (fast and faster) R-CNN and extracting feature before sending them to a simple CNN?
Naive approach with OpenCV: we are able to make that extraction
Capture simple objects and afine results
At first, let’s make a reminder of what is a CNN.
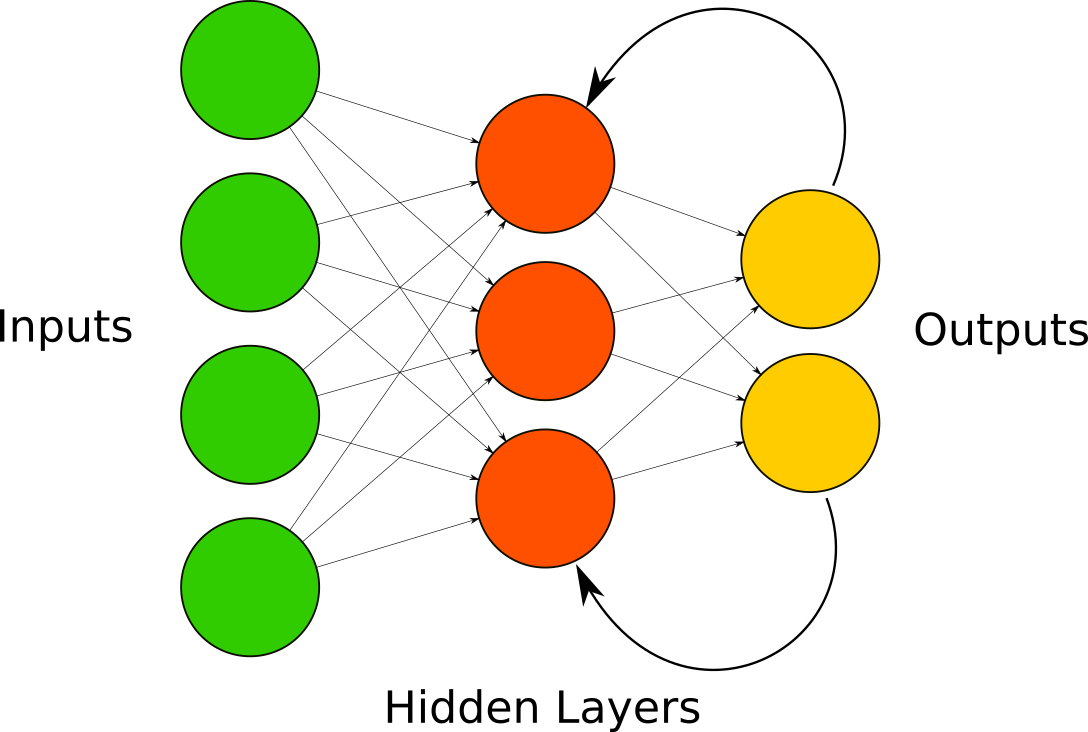
Convolutional Neural Network is a Neural Network that have several layers, the input is a matrix of [N,M] shape that will be flatten and introduce in the first layer. The first hidden layers makes some convolutions, that means that they apply some little matrices as a blur or Sobel/Laplacian transformations can do. We can use several hidden convolutional layers and then send the resulting “images” (that are matrices) to the fully connected hidden layers that are “perceptrons”.
As we are making a classifier, the outputs represent categories.

That’s pretty simple to make that CNN from scratch with Keras. But as you can see, that kind of network is only efficient for one object in the image.
Looking at our food tray, the extraction should be like the image below:
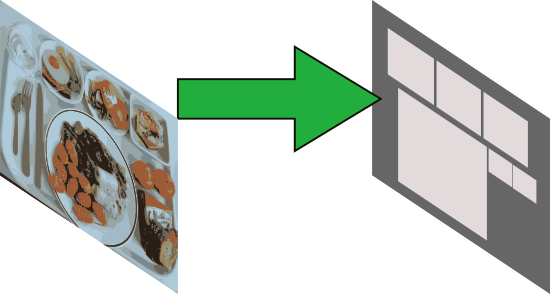
So, I tried to extract regions myself using OpenCV functions, and planned to use some R-CNN to suggest regions to be extracted.
Features extraction before the CNN marshals our images
Later in this article, you will see that R-CNN can make that work inside the neural network. But, for now, it’s very interesting to see that we can make features extraction to be able to tune and tweak.
Remember: I am in a mastered environment to capture images. Light and space should be the same and we only need to extract “foods” that is on the tray.
There are many ways to prepare image to get edges, shapes, and so on. The following extraction works for our environment. But it may be changed, adapted and entirely revisited.
The rules of thumb when you are in a project that has to manage data: analyze your data. There, we are working with images.
Take a look at the following sample image of a tray with foods:
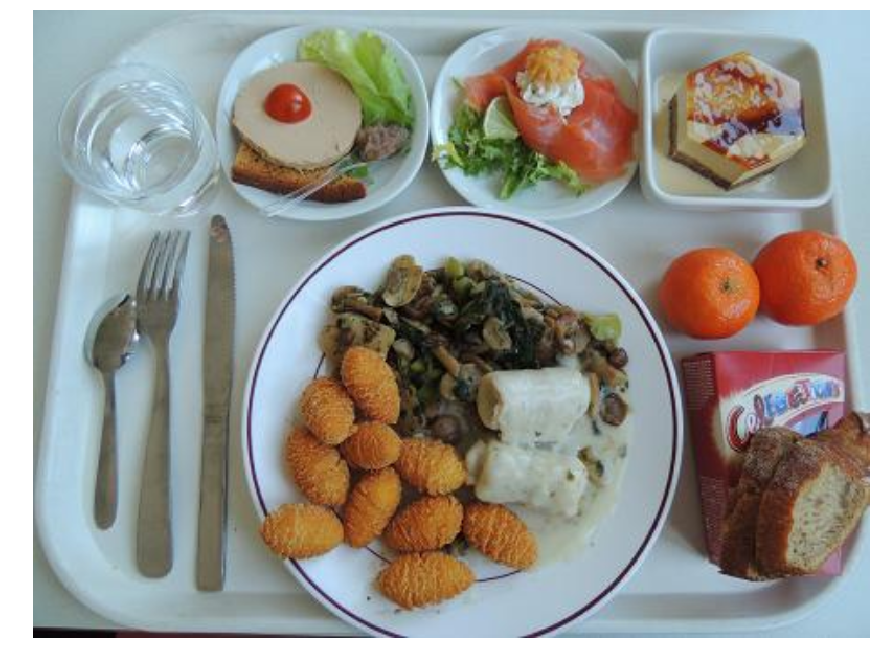
The question is: how you, I mean, your brain, is able to detect where is the food even if you don’t know what “food” means ? You should notice that you are making two distinct extractions: shapes, and colors.
For the shapes, a “rounded” object is not enough, because a plate and a tangerine are both circular in a two dimensions view. But mushrooms, tangerines, and what lies in the plate are generally colorized. It’s a good track isn’t it ? And even in gray scale, the contrast helps to determine where is the food and objects, and what is not the tray or the table itself. Let’s try to use these specificity to extract “regions of interest”. To compute that regions, I will make “image pre-processing”.
Image pre-processing
Image pre-processing is a suite of functions you can use to enhance quality, but also to add effects as color adjustments and extraction, shape modification, and so on.
Here, I will manipulate colors, contrast, threshold, and detect borders to have a mask of needed shapes.
Before beginning, working on Jupyter, I created some helpers function to speed up the work, for example:
1
2
3
4
5
6
# return RGB and Grayscale image from a source
def get_image(src="./medium/test.jpg"):
    im = cv2.imread(src)
    im = cv2.resize(im, (800,600))
    return cv2.cvtColor(im, cv2.COLOR_BGR2RGB),
           cv2.cvtColor(im, cv2.COLOR_BGR2GRAY)
RGB colorspace is not the best format to adjust saturation and colors, so we will use HSV colorspace. Making use of powerful tools such as OpenCV and the almighty Python NumPy library, that is fortunately not so complicated:
1
2
import cv2
im = cv2.cvtConvert(im, cv2.COLOR_RGB2HSV)
1
2
3
4
# # im[:, :, N] where N is the channel you need
# 0=H, 1=S, V=2
# let's try to make saturation + 80
im[:, :, 1] += 80
1
2
3
# reconvert before display
plt.imshow(cv2.cvtConvert(im, cv2.COLOR_HSV2RGB))
plt.show()
Here is a function I’m using and that works:
1
2
3
4
5
6
7
8
9
10
11
12
13
14
15
16
def augmentation(im, fact=.0):
    if fact > 1:
        fact = 1.0
    # get HSV
    hsv = cv2.cvtColor(im, cv2.COLOR_RGB2HSV)
    # set it to numpy array
    hsv = np.array(hsv)
    h = hsv[:,:,0]
    s = hsv[:,:,1]
    v = hsv[:,:,2]
    # fact * channel
    hsv[:,:,0] = np.where(h*fact <= 255, fact*h, h)
    hsv[:,:,1] = np.where(s*fact <= 255, fact*s, s)
    hsv[:,:,2] = np.where(v*fact <= 255, fact*v, v)
    # return hsv and rgb
    return hsv, cv2.cvtColor(hsv, cv2.COLOR_HSV2RGB)
That function is very helpful, for example here is an image where we changed HSV channels with a factor of 1, without changing image to RGB
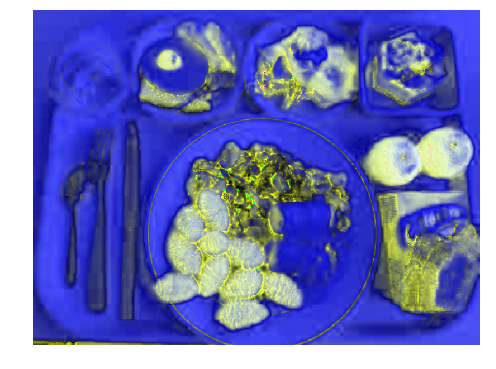
As you can see, food is already well augmented. As we are displaying HSV in RGB, the green channel corresponds to the saturation, and so you can see that, in my case, I can help food region extraction using saturation (and some other image processing I will do later).
I’m now able to find contours 🎉.
Finding Contours
Now the image can be “augmented”, I am able to extract the right features.
I tried several approaches:
-
blob detection — kind of concave and/or convex shapes — that was not very efficient
-
convolutions — that’s what does R-CNN and that’s a good approach
-
structure detection — that may help a lot convolutions or contour search.
Structure detection was the best option for my tests. Let me explain what I did:
-
create structuring element as ellipsis (that is a smooth shape to detect)
-
use threshold to make a pure black and white extraction
-
dialte and erode the result to smooth edges and shape — that helps a lot the contour detection
-
contour detection
Some code is sometimes worth a thousand words and so here is the function:
1
2
3
4
5
6
7
8
9
10
11
12
13
14
15
16
17
18
19
20
21
22
23
24
25
26
27
28
29
30
31
32
33
34
35
36
37
def extract_features(im,
                     threshold=144,
                     ellsize=16,
                     augmentation=0.,
                     erosion=8,
                     dilatation=4):

    hsv, im = augmentation(im, augmentation)
    gray = cv2.cvtColor(hsv, cv2.COLOR_RGB2GRAY)

    # make 2 blurs
    mask = cv2.GaussianBlur(gray, (15,15), 0)
    mask = cv2.GaussianBlur(mask, (3,3), 0)

    # create structure element
    ellipses = cv2.getStructuringElement(cv2.MORPH_ELLIPSE,
                                           (ellsize, ellsize))

    # get 2 masks, one closed to the edges, other makes a
    # kind of dilatation of the first one
    mask = cv2.morphologyEx(mask, cv2.MORPH_CLOSE, ellipses)
    mask = cv2.morphologyEx(mask, cv2.MORPH_OPEN, ellipses)
    # binarize that !
    _, contour = cv2.threshold(mask,
                               threshold,
                               255,
                               cv2.THRESH_BINARY)


    # erode and dilate to get contours
    erode   = cv2.erode(contour, None, iterations=erosion)
    contour = cv2.dilate(erode, None, iterations=dilatation)

    # return the ellipsis and contour image
    # - ellipsis mask is returned
    # only to visualize what's happend
    return mask, contour
Note that I also tried to make threshold before eroding and dilating the map, but in most cases I generally had not much difference between the results. But you can do it as an exercise to test your own filter sequence.
An example of output using Jupyter with widgets to find nice parameters, keep in mind that we will tweak parameters afterwards:
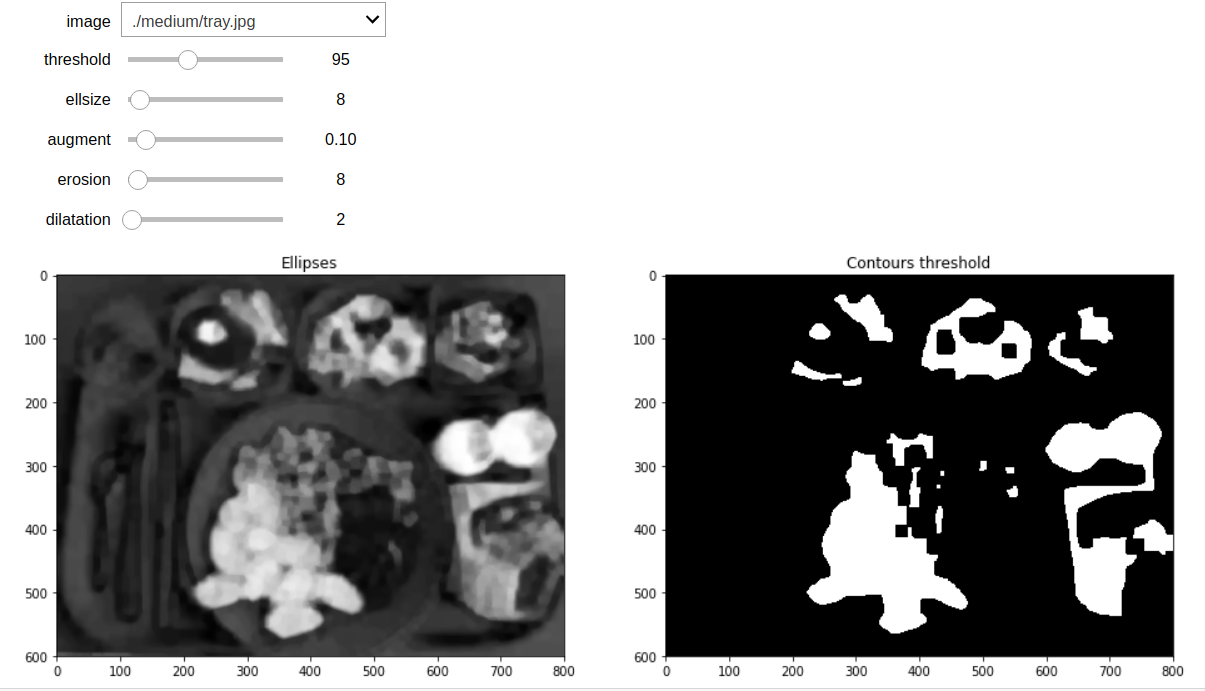
On the left, there is the structure ellipsis result that helps creating some “blobs”. Merged together, those blobs yield bigger and simpler shapes. On the right, you can see that erosion and dilatation with threshold can split regions. I will now use that features map to get bounding boxes. Of course, we will change some values to fine tune element separation. But we now have Region of Interest (or RoI for short) and we will be able to make contour detection with OpenCV that natively proposes functions for that kind of operation.
The code below draws boxes around features.
1
2
3
4
import imutils
# extract features, that parameters were good enough to
# make some tests
_, mask = extract_features(im, 116, 16, 141, 2, 6)
1
out = img.copy()
1
2
# we need to invert mask
mask = cv2.bitwise_not(mask)
1
2
3
4
# note that RETR_CHAIN is also usable
contours = cv2.findContours(mask,
                            cv2.RETR_LIST,
                            cv2.CHAIN_APPROX_SIMPLE)
1
2
3
4
5
6
contours = contours[0] if imutils.is_cv2() else contours[1]
contours = contours.sort_contours(contours)[0]
# loop over the contours
MINWH = 100
for (i, c) in enumerate(contours):
    ((x, y), (w, h), _) = cv2.minAreaRect(c)
1
2
3
4
5
6
    # remove too small regions
    if w > 40 and h > 40:
        x = int(x-w//2)
        y = int(y-h//2)
        w = int(x+w)
        h = int(y+h)
1
2
        # draw a box
        out = cv2.rectangle(out, (x, y), (w, h), color, 2)
One more time, Jupyter and widgets were used to check results, and we can now see a result close to the expected one:
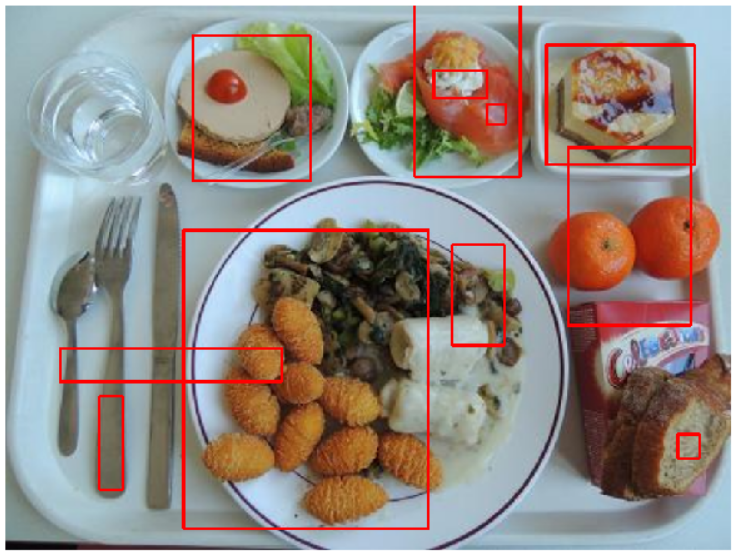
So, because it’s a mastered environment, I could refine filters values to get better regions. After a while, I found good values that works with several shots. One more time Jupyter helps a lot to make tests:
The function is very fast. OpenCV computes matrices and region calculation in 5-10ms.
Instead of drawing regions, you will be able to crop images to get RoI and send them one by one (or in parallel with multiprocessing) to the CNN to check which categories are detected. I only kept the best results.
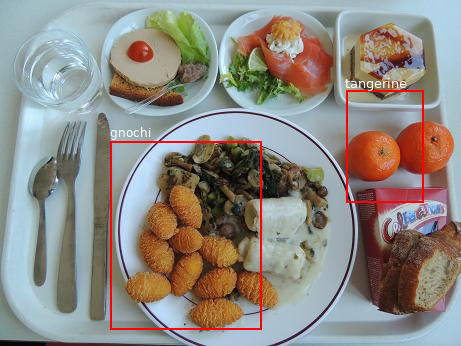
On the left, I sent 2 boxes to the CNN that learned what are tangerines and gnocchi — and as expected, it found the right class for each of that boxes.
In addition, I am able to use detection with multiprocessing to reduce the time of detection. That image needed 100ms to get detected classes on NVidia 1060.
Please keep in mind, we hereby only get boxes around food and that’s very interesting, but in the real world it could be better to have more extracted regions, even if there is no food in it. The neural network will say that these regions are something else and we can deal with it. Actually, the R-CNN approach does that, it proposes regions to the detection even if the object is not what we are searching. But, you also need to not have too much regions because the number of detection process will dramatically increase and make your code working slower.
What I’ve made was a simple ConvNet with 4 layers and I trained the model with images of food. I didn’t need to have “annotated images” as our images were only one piece of food per image. Passing the image in my filter, then cropped regions are sent to my model — the precision was impressive for a simple proof of concept, near 90% of accuracy.
> The precision was impressive for a simple proof of concept, near 90% of accuracy
Conclusion for OpenCV feature extraction approach: if you really don’t want to hit R-CNN, and build a little CNN with 3 or 4 hidden layers to categorize a restricted list of objects, that method is sufficient.
Pros
-
This is easy to get your own values in a mastered environment
-
You really understand what you do
-
You can adapt and add more filters to change the entire extraction without to retrain the model
-
You are able to create several extraction to get special regions to detect in a CNN model
Cons
-
There is a strong sensibility of the environment (point of view, lights, colors)
-
Hard to share that to others projects
-
You manually do what a R-CNN does
Note the last point: You manually do what a R-CNN does.
The method is absolutely not bad, really. That can be very useful to separate the feature extraction and the detection in CNN when you’re environment lends itself. For example, if you want to detect each red objects in a scene, trees, or big objects, a feature extraction upstream a CNN is very useful. It may help and ease the work.
But as soon as the objects have many colors, shapes and if light moves, that kind of work is probably a waste of time. Because R-CNN will learn to extract regions for you. That is the following part.
Use R-CNN, YOLO, Fast and Faster R-CNN, and so on
R-CNN are “Recurrent Convultional Neuron Network” and that kind of model is very efficient. Take the time to read this article to understand how that works.
https://medium.com/@smallfishbigsea/faster-r-cnn-explained-864d4fb7e3f8
As a reminder, R-CNN, either simple, fast or faster, are neural networks that makes back links from layer to upper layers.
That way, Neural Network can propagate values to be retreated and get higher accuracy about extracted features that comes from the convolutional layers. Also, layers are not all fully connected but locally connected. The extraction region is connected to some neurons, other regions to other neurons, and so on.
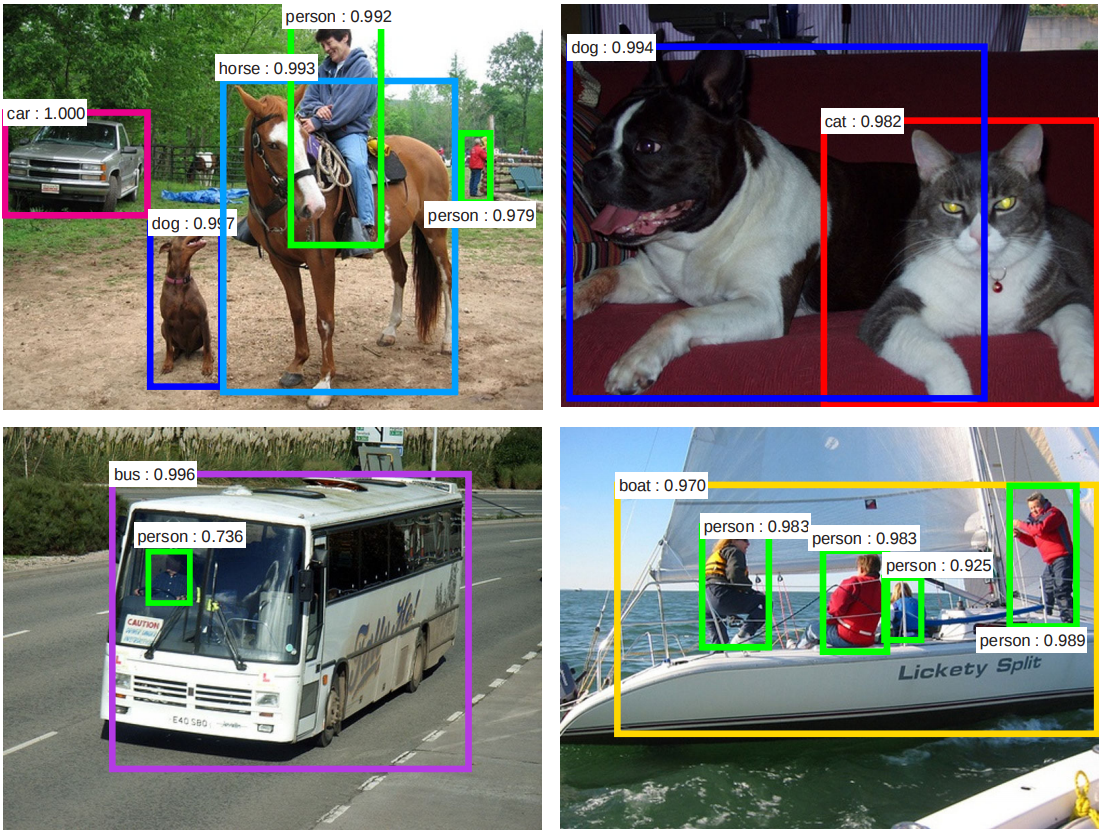
So R-CNN can now propose “region proposals” that allows multiple features extractions in a “features map” that will be treated to classify multiple objects.
That’s what does that well-known R-CNN:
If you are interested to check what are the CNN/R-CNN differences, I encourage you to have a look on this article that gives a non-exhaustive list of famous models architectures:
https://medium.com/@siddharthdas_32104/cnns-architectures-lenet-alexnet-vgg-googlenet-resnet-and-more-666091488df5
There were two majors upgrades for the R-CNN: Fast R-CNN and Faster-R-CNN. While the first was an big improvement of accuracy and speed detection time, the last one is very impressive. Faster R-CNN makes use of several treatments as getting multiple scales, pyramid image and features map, and anchor boxes.
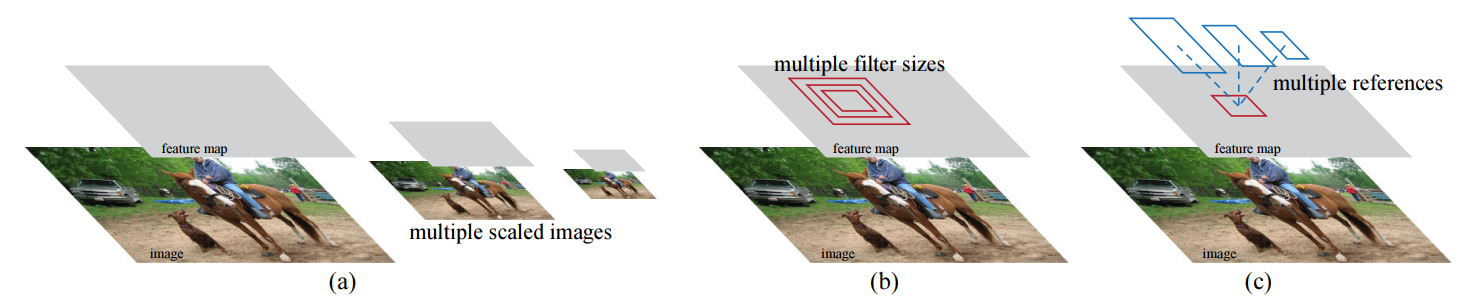
The result proposed in the paper shows how it can be efficient and accurate.
The counterpart is that you’ll need a very dense image set to train the model which is not only to separate images per categories. You’ll need to get bounding boxes in a file for each object and categories. But, by the way, you can use a transfer learning implementation to use pre-trained models adding you own categories. That’s what I did with Retinanet implementation with ResNet model.
Fast R-CNN with Retinanet and Keras
Retinanet is R-CNN using Focal Loss for Dense Object Detection that aims to use ResNet model and adapt a better loss function to detect objects.
You can get RetinaNet models and package on the following github page:
https://github.com/fizyr/keras-retinanet
For the test, I used 5 kinds of food: tangerine, risotto, beans, bread and salad.
I needed to classify images. Retinanet proposes to use several annotation formats ad Pascal COV or MS COCO — I decided to use a simple format that is CSV. So, I had to create two files, one for the classes, and another that references the bounding boxes for images with the corresponding class.
The first one, classes.csv, contained:
risotto,1
salad,2
little-bread,3
tangerine,4
beans,5
And the second file, annotation.csv, described bounding boxes for each images:
pic-037.jpg,80,20,500,120,risotto
pic-025.jpg,520,250,1152,953,risotto
pic-with-nothing.jpg,,,,,
pic-004.jpg,0,0,1600,1113,beans
...
Of course, one image may appear several times if there is several foods on that image. We only have to record several lines describing bounding boxes for each visible food. That process was really long to do. Yes we could have uses ImageNet sets but we didn’t find enough images of food that is on our tray images. So I needed to make that myself. The web platform “Supervisely” (https://supervise.ly/) could have been a good tool to achieve that, but I finally used “opencv_annotation” tool and made scripts to transform the resulting files to CSV files.
With my NVidia 1060 (3Go RAM), the training script provided by the project crashed frequently. So I created that python script to make it possible to work:
1
2
3
4
5
6
7
import keras
from keras.preprocessing.image import ImageDataGenerator
from keras_retinanet.preprocessing import csv_generator
from keras_retinanet.models.resnet import resnet50_retinanet
from keras.optimizers import SGD, adam
from keras.callbacks import ReduceLROnPlateau
import keras_retinanet.losses
1
2
# ... skip train generator
# ... skip some works
1
2
3
4
# then:
ts = train_gen.samples  // batch_size
vs = validation.samples // batch_size
epochs = 500
1
2
3
4
5
6
7
8
9
10
# +1 because classes 0 doesn't exist, that will be the
# classification to get "others" thing than food
model = resnet50_retinanet(len(train_gen.classes)+1)
model.compile(
    loss={
        'regression'    : keras_retinanet.losses.smooth_l1(),
        'classification': keras_retinanet.losses.focal()
    },
    optimizer=SGD(lr=1e-5, momentum=.9)
)
1
2
3
4
5
6

lr_scheduler = ReduceLROnPlateau(verbose=1,
                                 factor=.5,
                                 monitor="val_regression_loss",
                                 min_lr=1e-7,
                                 patience=10)
1
2
3
4
5
6
7
model.fit_generator(train_gen,
                    validation_data=validation,
                    validation_steps=vs,
                    epochs=epochs,
                    callbacks=[lr_scheduler],
                    verbose=1,
                    steps_per_epoch=ts)
Note that the documentation advises to use Adam optimizer with a learning rate to 10⁻⁵ but we notice that stochastic gradient descent (SGD) with a momentum to 0.9 and learning rate to 10⁻⁵ was better with our model. As seen in the search paper “An overview of gradient descent optimization algorithms” page 4, the momentum in usually set to 0.9.
And after a while (several hours), we finally get a model that works. Because of the lack of train data, results were not so impressive but the boxes were well placed and categorization was promising.
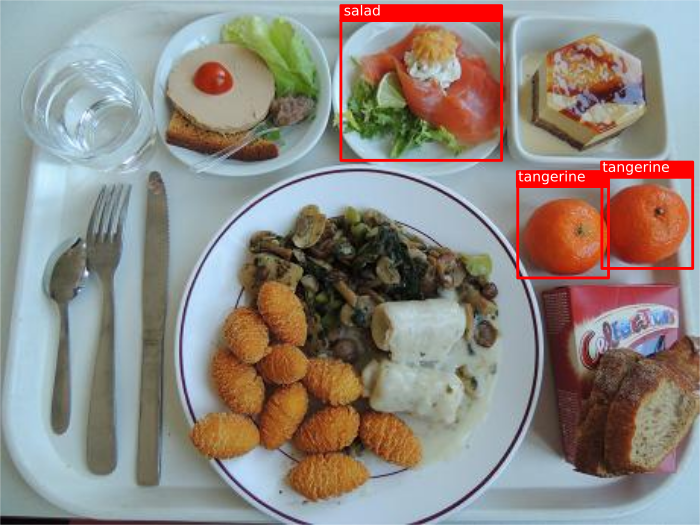
Please, take the given result image with caution: we needed to tweak the results to get proper bounding boxes as we didn’t have enough images to train, and so the result was not as reliable as the image may let you believe. Keep in mind that we needed to fix returned detection matrices and filter some that were not what we wanted. Taking all this into account, the precision we ended up with for tangerine was ~88% and salad ~65% which confirms the lack of training data and surely that we didn’t made enough learning epochs (I used 500 epochs for this test).
Actually, I didn’t train the model to learn desserts, gnocchi or bread for example. I was thus only able to detect tangerines and salads that we have annotated. Also, I really needed a bit more epochs to enhance the model detection, some of our tests were failing even if the image was containing a known food.
Pros
-
Trainable features extraction, the model finds the best convolution to extract features
-
Adapted for many environment, your train set can have images with different lights, exposition, colors,…
Cons
-
Complex to tweak, the neural network is way too complex and need a large knowledge to be able to enhance or adapt it
-
Cannot be adapted for certain environment, especially when you haven’t enough of image to train the model
-
Train phase is long due to the fact that you need a lot of images (more than 500 per class) and should be manually annotated
Conclusion
Even if the State of the Art on image detection is now R-CNN, it is not meaningless to consider a features extraction by yourself. Combining several approaches can make sense when you need to arrange and tweak your data. Data scientists sometimes adapt the inputs to have best accuracy while they’re working on Machine Learning, so why not do the same with Deep Learning on Convolutional Neural Network.
That being said, region extraction that are proposed by R-CNN are generally very good and, as I’ve said, that’s the State of the Art. It’s efficient, doesn’t need tweak and code, the only prerequisite is to have a well trained model, that means: a large image set to train the model to classify.
Keras RetinaNet seems to be a very good library to get a working model from ResNet pre-trained model, and it’s also possible to use MobileNet model that is a bit faster at the detection phase.
But to come back to the reason we did this :
-
even with a naive approach we have been able to prove our ability to recognise the food items on the lunch tray with enough trust to bill them (>80% of success)
-
we know that improvements will come from much more training data
-
we also know that this is a lab experiment and we would need to collect data from the real world (client environment) to ensure a continuous enhancement of training data
-
R-CNN will have to be used if the real conditions constrains (point of view, lights, colours) are too complex to fix
References
Papers
-
Rapid Object Detection Using a Boosted Cascade of Simple Features, Viola, P. and Jones, M. — http://www.merl.com/publications/docs/TR2004-043.pdf
-
Edge Detection, Cornelia Fermüller and Marc Pollefeys — http://www.ics.uci.edu/~majumder/DIP/classes/EdgeDetect.pdf
-
Faster R-CNN: Towards Real-Time Object Detection with Region Proposal Networks, Shaoqing Ren, Kaiming He, Ross Girshick, and Jian Sun — https://arxiv.org/pdf/1506.01497.pdf
-
Focal Loss for Dense Object Detection, Tsung-Yi Lin, Priya Goyal, Ross Girshick, Kaiming He and Piotr Dollar — https://arxiv.org/pdf/1708.02002.pdf
-
An overview of gradient descent optimization algorithms, Sebastian Ruder — https://arxiv.org/pdf/1609.04747.pdf
Libraries
-
OpenCV — http://www.opencv.org
-
TensorFlow — http://www.tensorflow.org
-
Keras RetinaNet — https://github.com/fizyr/keras-retinanet
-
Supervisely — https://supervise.ly/