
How to work with Time Distributed data in a neural network
And how to use it for videos input, movements detection, gestures recognition…
⚠ Important note: There is an error in explanation I give in the article. I often say that weights are shared in each distributed branche (I said that each models in Time Distributed layers are the same). That’s wrong, I badly explained. What I mean is that weights are trained in the same backward pass and not separately (because there is only one layer applied to each inputs). That means that if you want to detect a cat that is jumping, the model will not try to “detect a cat in each frame”, but it will try to detect a jumping cat by analyzing the “sequence”. I also said that each input has got a “branch”, but actually it’s the same layer that is applied to inputs one after the other. Then the weights are tweaked. Keep that in mind while you’re reading this article. EDIT: I fixed many part of the article.
In Machine Learning, you can now predict values on complex data by using Neural Networks. And for the majority of them, you will send one or several inputs to be analysed. Sometimes, these values are chronological. For example stock prices in time, video frames, or human-size at a certain age in its life. For this kind of data, we already have some nice layers to treat data in the time range, for example, LSTM. But what if you need to adapt each input before or after this layer? This is where Time Distributed layer can give a hand. Keras proposes this one, and we will first try to understand how to use it. Then, in the next article, we will try to use it with a movie as input to detect actions. Now, let’s check their use.
What’s the problem to solve?
If you already worked with Convolution Neural Networks (C-NN), you’ve probably created models that take only one image to be classified.
But what if you need to present several images that are chronologically ordered to detect movements, actions, directions…? What we need is to be able to inject a sequence as input, and to make predictions of what that sequence is showing.
Hopefully, Keras (and other frameworks of course) provides objects that can manage that kind of data.
🔔 This is named “Time Distributed” layer.
With this short introduction, you probably don’t realize why we use it. You need to have more explanation about what is a Time Distributed layer, and which are the problems it can resolve.
💡 We also need another kind of layer that is the famous “LSTM” (or GRU). It is not mandatory but it will finalize the chronological resolution of inputs.
And finally, we will enhance the model by making “fine-tuning”, also named “transfer learning”, to have very accurate results.
So many things to do… But ! that will be fun 🎉
I will not explain what is LSTM in-depth — keep in mind that it helps a lot to manage a series of data that are* chronologically ordered. We already have made an article to explain how we use it to make *cryptocurrency stock prices prediction.
That’s very powerful, almost magical :
https://medium.com/smileinnovation/how-to-make-profits-in-cryptocurrency-trading-with-machine-learning-edb7ea33cee4
While the previous article explains how to use cryptocurrency data, we need to work with images. And what do we generally need on machine learning while we are working with images? huh? yes! Convolutions! You’re right and win a gift: 🎁
OK, commonly, a C-NN receives only one image and we make convolution on that one. The goal is to find features on those images that will help to make a “prediction” to guess the object on that image.
For example, we present an image of a cat, and the model says “it’s a cat”.
But now, we don’t want to make that. We want… but we need to make “more” because the expected result is not “a cat”, but “a cat is jumping”.
You realize that what we need is to find features to find the cat, then use these features in “LSTM” to try to react on movements (or distortions). Finding a jumping cat now needs:
-
find the cat on each frame
-
then check if the cat movement corresponds to the “jumping” action
So we need to repeat several “cat” detection, and only after that we need to check the “action”, the “movements”.
Time Distributed layers will save your day.
Images should not be fully connected in one convolution
The problem is that we’ve got not only “one image” to manage, but we’ve also got potentially 2, 5,… 10 images to inject in the model. And we need to make convolutions for each image.
And because everything is never that simple, that’s not the only problem to solve 😟.
The first problem, the input shape — and the unwanted “image merging”
If we take a common Sequential neural network, each input is connected to the entire neuron list that resides in the first layer. For only one image, it’s OK — but with several images, we need to avoid merging several images in one **because the **whole pixel list of all images will be sent to the first layer.
That means that if I send several images in the first layer, then I will merge the images. And this is not what I need!
Anyway, if you try to make that, what is the “shape” to set up to that layer?
The next image is what we don’t want to do :
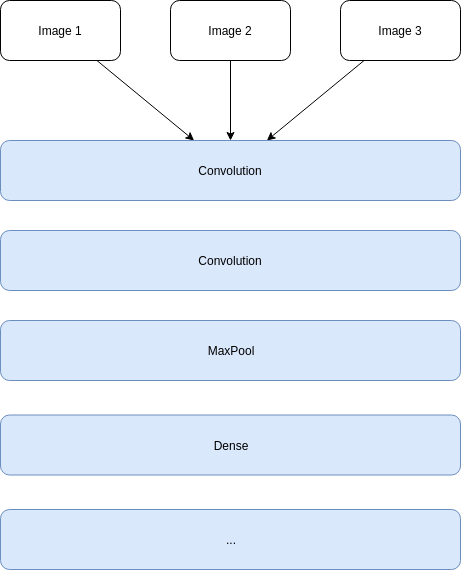
Let’s take an example of 5 images with 224x224 pixels in grayscale (one channel), Conv2D cannot use a (5, 224, 224, 1) shape (it requires 3 dimensions), and Conv3D is not made to manage that kind of input. No, we need to split the network to have one filter list for each image input (or any other structural data)
We need to pass one image to one “convolution block”, the second to another, and so on…
So this is what we need to do:
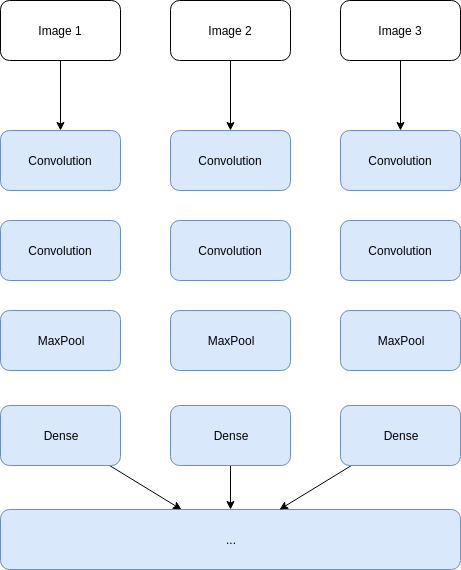
Now, each image has got its own “convolutions flow” and we can, finally, continue the detection.
It’s like we’ve got one neural network per image, then a last one to make inferences.
If we separately train each “convolution flow”, so we will have several unwanted behaviors:
-
we need very long training because we need to train several convolution flows (one per input image)
-
each convolution flows, for one sequence, can have several different weights, and so different features detection that are not linked
-
some convolution flows will not detect what others flows can
We need to be sure that the entire list of convolution flows can find the same features. It’s possible that some convolution flows detect something else, but we need to reduce that risk.
TimeDistributed layer apply the** same layer to several inputs. **And it produce one output per input to get the result in time. That’s all !
What do we want to do 🤔 ?
OK, so the need is simply to be able to get several images as input, making the same filtering for each image, and finally to be able to continue the model with other common layers (eg. LSTM…)
We need to train each input neural network in each distributed branch for one detection (the action, the movement…) and…
..this is what allows “Time Distributed Layer” — our Savior 👼
Finally, let’s use Time Distributed Layers
Time Distributed layer will do that job, it can apply the same transformation for a list of input data. That can work with several inputs type, including images. All convolutions, Pooling, Dense…
Afterwards, you can leave the time distributed layer to continue to work with data.
Keep calm, that will be very nice and easy to do.
How to use it?
With Keras, the method is the following:
1
model.add(TimeDistributed(TYPE))
Where TYPE is a needed layer. For example:
1
2
3
4
5
model.add(
    TimeDistributed(
        Conv2D(64, (3,3), activation='relu')
    ),
)
That’s not so complicated. It generates 64 convolutions, for each input image. Wait… “input images”?
For the first layer, you generally need to specify the input shape.
Usually, a convolution network get one image with shape (width, height, channel_number) (3 dimensions shape).
Here, we need to define how many images will be injected into the model in one shot. So if the Time Distributed layer is the “input” of the model, we need to set up one more dimension that is the number of the image in one shot.
For example, if we need to inject 5 images that have the shape (224, 224, 3) (244x224 with 3 RGB channels): we need to add one dimension to present 5 x (224, 224, 3) — the shape is now (5, 224, 224, 3)
So, for the first layer, if you need to provide the input shape, you can do:
1
2
3
4
5
6
model.add(
    TimeDistributed(
        Conv2D(64, activation='relu'),
        input_shape=(5, 224, 224, 3)
    )
)
And now, we’ve got 64 convolutions, on 5 images that are shaped 224 x 224 with 3 channels (RGB). This 5 convolution flow will be trained in parallel to match the wanted detection.
K̶e̶e̶p̶ ̶t̶h̶a̶t̶ ̶i̶n̶ ̶m̶i̶n̶d̶:̶ ̶t̶h̶a̶t̶ ̶g̶e̶n̶e̶r̶a̶t̶e̶s̶ ̶5̶ ̶x̶ ̶6̶4̶ ̶c̶o̶n̶v̶o̶l̶u̶t̶i̶o̶n̶s̶ ̶i̶n̶ ̶t̶h̶e̶ ̶m̶o̶d̶e̶l̶,̶ ̶i̶t̶’̶s̶ ̶n̶o̶t̶ ̶w̶i̶t̶h̶o̶u̶t̶ ̶c̶o̶n̶s̶e̶q̶u̶e̶n̶c̶e̶ ̶f̶o̶r̶ ̶m̶e̶m̶o̶r̶y̶,̶ ̶C̶P̶U̶s̶ ̶a̶n̶d̶ ̶G̶P̶U̶s̶.̶ Actually, what makes TimeDistributed layer is to apply the same convolution for each input, and it make it time one after the other.
For the next layers, we can let Keras guess the right shape to connect as it does for any other layer types. You don’t need to specify the shape.
What TimeDistributed layer proposes is exactly what we need, the allConv2D blocks that are created will be trained for our wanted detection, so our images will be processed to detect something that is not a simple object detection, but something that “changes” from frame to frame (for example).
That way, we can apply well-known topology to a series of input data. Here, a pseudo VGG for each frame (on the last section, we will use a simpler method to create that kind of model)
1
model = Sequential()
1
2
3
4
5
6
7
8
9
10
11
12
13
14
15
16
17
18
19
20
# input, with 64 convolutions for 5 images
# that have (224, 224, 3) shape
model.add(
    TimeDistributed(
        Conv2D(64, (3,3),
            padding='same', strides=(2,2), activation='relu')
        input_shape = (5, 224, 224, 3)
    )
)
model.add(
    TimeDistributed(
        Conv2D(64, (3,3),
            padding='same', strides=(2,2), activation='relu')
    )
)
model.add(
    TimeDistributed(
        MaxPooling2D((2,2), strides=(2,2))
    )
)
1
2
3
4
5
6
7
8
9
10
11
12
13
14
15
16
17
18
# Second conv, 128
model.add(
    TimeDistributed(
        Conv2D(128, (3,3),
            padding='same', strides=(2,2), activation='relu')
    )
)
model.add(
    TimeDistributed(
        Conv2D(128, (3,3),
            padding='same', strides=(2,2), activation='relu')
    )
)
model.add(
    TimeDistributed(
        MaxPooling2D((2,2), strides=(2,2))
    )
)
1
2
## and so on with 512, 1024...
## ...
1
2
# then we can use Flatten to reduce dimension to 1
model.add(Flatten())
1
2
3
4
## and then... merge the entire outputs to
## be able to use Dense(), and make predictions...
model.add(Dense(10))
# ...
And that’s it! Not so complicated.
No need to make several “models” to connect together, no need to manage weights, e-a-s-y!
Keep in mind that each layer that is “Time Distributed” will share the same weights. If you injects 5 images, the weights are not tweaked 5 times, but only once, and distributed to every blocks defined in the current Time Distributed layer. That saves calculation time !
At this time, we’re not far from the final working model. The last point is to be sure that we process images with the time notion. That means that we want to treat the frames in the exact order they come in, with a chronological notion. There is at least one neural computation that is very efficient for that: LSTM
“Hey Snips, define LSTM!”
LSTM for “Long Short Time Memory”, is a layer that can get several chronological inputs to find what is very useful to predict. It’s a simplified explanation, but it’s near the reality.
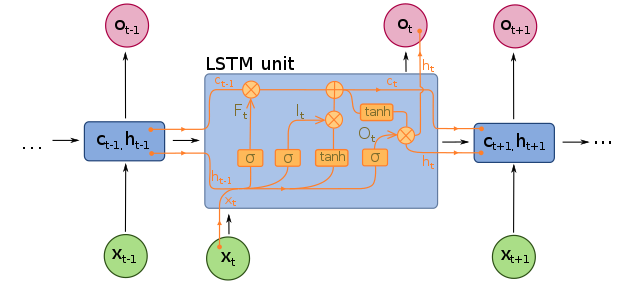
As we are working on frames that are chronologically ordered, we want to be able to detect relation from frame to frame in a given time.
Because we’ve got inputs that are ordered in time, LSTM is perfect to filter useful values from those inputs.
There are commonly 2 possibilities:
-
make convolution or other neural computation before LSTM
-
make the same kind of work after LSTM
To decide which order to choose, you need to think about what you want to filter.
For our example, we need to check an object in motion, so we need to search the object before detecting the movement. So, here, we need to make convolutions before LSTM.
For another example, as cryptocurrency evolution, you can filter input values in time with LSTM, then make some manipulation on the output to find evidence. In this case, you can usefully connect layers after LSTM block.
But, both cases are not constructed the same way, you’ll need to tweak LSTM to adapt the output.
Time Distributed before LSTM
🚀 Goal: do some computation before managing the time.
Transforming input data that are distributed in time is OK, but the network is not yet able to use the LSTM power. We now need to let the network to be able to use memory and enhance the prediction by taking advantage of LSTM.
For the previous example, we worked with images that are “inputs”, so that’s obvious to make Time Distributed layers before the LSTM layer because we want to let LSTM work with convoluted images.
The LSTM output should not be a “sequence” (you can, but it’s useless here) — we only need to make some fully connected layers to find predicted “action” that is present on our input frames. So we set return_sequence to False
For images, the following python source is a pseudo example with Time Distributed layers before the LSTM layer:
1
model = Sequential()
1
2
3
4
5
6
7
8
9
10
11
12
# after having Conv2D...
model.add(
    TimeDistributed(
        Conv2D(64, (3,3), activation='relu'),
        input_shape=(5, 224, 224, 3) # 5 images...
    )
)
model.add(
    TimeDistributed(
        Conv2D(64, (3,3), activation='relu')
    )
)
1
2
3
4
5
6
7
# We need to have only one dimension per output
# to insert them to the LSTM layer - Flatten or use Pooling
model.add(
    TimeDistributed(
        GlobalAveragePooling2D() # Or Flatten()
    )
)
1
2
3
4
5
# previous layer gives 5 outputs, Keras will make the job
# to configure LSTM inputs shape (5, ...)
model.add(
    LSTM(1024, activation='relu', return_sequences=False)
)
1
2
3
4
# and then, common Dense layers... Dropout...
# up to you
model.add(Dense(1024, activation='relu'))
model.add(Dropout(.5))
1
2
# For example, for 3 outputs classes
model.add(Dense(3, activation='sigmoid'))
1
model.compile('adam', loss='categorical_crossentropy')
The model is more or less:
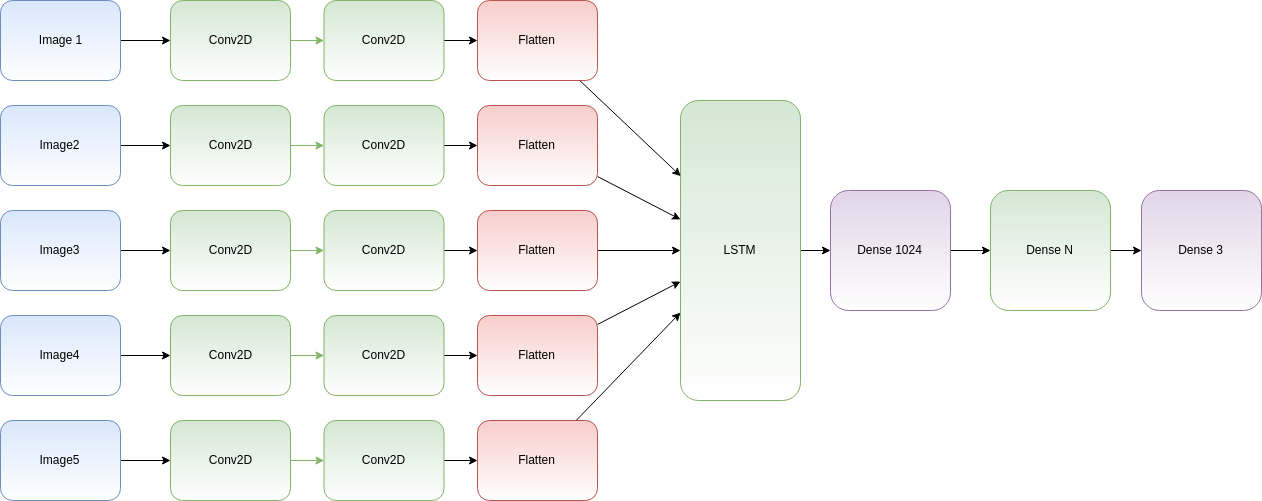
Please note:** **The above graph is a representation, actually for each input, you will use the same Conv2D and Flatten layers. Keras will distribute the input in layers step by step.
The Flatten layer is only needed because LSTM shape should have one dimension per input.
👀 Our next article will show you examples on video, stay tuned !
Time Distributed after LSTM
🚀 Goal: manipulate data after having managed the time.
This time, we need to set up LSTM to produce a sequence. We can imagine that we want to inject 5 items of 10 values and make some transformation on the sequence that LSTM can produce.
But this time, we want to make a fully connected computation on each filtered element. LSTM is not only a “filter”, but it also keeps each input computation in memory, so we can retrieve them to make our manipulation.
That’s what the return_sequences attribute provides. LSTM will now produce 5 outputs that can be time distributed.
1
model = Sequential()
1
2
3
4
5
6
7
8
9
# a model with LSTM layers, we are using 5 frames of
# shape (10, 20)
model.add(
    LSTM(1024,
        activation='relu',
        return_sequences=True,
        input_shape=(5, 10)
    )
)
1
2
3
4
5
6
7
8
9
10
# LSTM outputs 5 items
# that is the correct shape to continue to work.
# We need to get several outputs and make the same
# process on each sequence item:
model.add(TimeDistributed(
    Dense(128, activation='relu')
))
model.add(TimeDistributed(
    Dense(64, activation='relu')
))
1
2
3
4
5
6
# Flatten, then Dense... Dropout...
# note: Flatten should not be time distributed because here,
# we want to have only one dimension for the next layers
model.add(Flatten())
model.add(Dense(64))
model.add(Dropout(.5))
1
2
# use N outputs
model.add(Dense(N, activation='softmax'))
That is more or less the following representation:
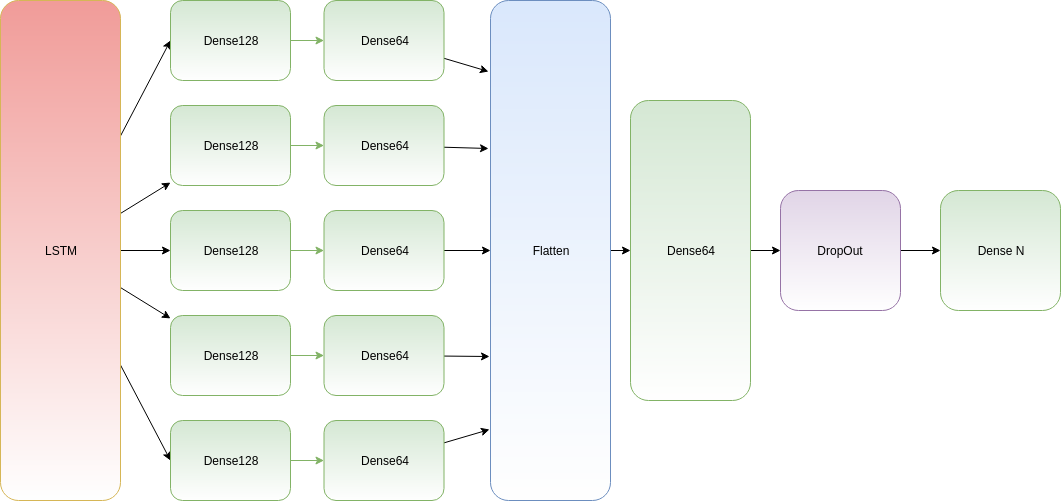
Of course, that’s an example to illustrate how to create a model. The above model is not useful, you’ll need to adapt it to your needs.
As you can see, we generally need to use the “Flatten” layer to be able to merge neurons outputs and commonly continue the network.
And one more time, Keras helps a lot to not have to make shape deduction by our self. The model writing is natural, readable, easy to understand and very instinctive.
Writing that kind of neural network by hand can be very complicated and potentially difficult to debug. To make proof of concept, Keras is a rare framework that allows making tests on that kind of neural network without wasting our time to check what and how to connect.
💡 The power of Time Distributed layer is that, wherever it is placed, before or after LSTM, each temporal data will undergo the same treatment.
So wherever the situation of the data in time, it will receive the same transformation.
Transfer Learning in Time Distributed block, this is possible?
Strangely, I never saw something telling about the fact that we can add a complete model inside a second model with Keras. I mean that I generally see examples where the base model output is connected to our model inputs. But, Keras can ease that construction by using a model as a layer.
Let me explain. I was using a pre-trained model to do transfer learning that way:
1
2
# use pre-trained VGG16
vgg = VGG16(...)
1
2
3
4
# add our own layers
x = vgg.output
x = Dense(64)(x)
...
1
2
# prepare our output
pred = Dense(3, ...)(x)
1
model = Model(inputs=vgg.inputs, outputs=pred)
But, what I didn’t know is that we can use model.add() method to inject… a model. As we do it with “Layers”.
So, that’s how I can make transfer learning with a pretty nicer syntax (it’s a truncated example, of course, you need to manage input shape, activations…):
1
2
vgg = VGG16(...)
model = Sequential()
1
2
# add vgg model to our own model
model.add(vgg, input_shape=(...))
1
2
# and add our layers
model.add(Dense(64))
1
2
# finally 3 outputs
model.add(Dense(3))
I don’t know what you think, but I prefer that syntax. Easier to read and write.
⚠ Appending a model as a Layer, and connecting base model outputs to model inputs isn’t the same. The first method generates a heavier model with scopes, while the second is a bit lighter and readable if you preview the graph as a chart. Adding model as a Layer should be, IMHO, avoided ! But it’s easy for prototyping and tests.
What about Time Distributed? Well, that’s the same.
I wanted to use transfer learning of VGG16 with imagenet pre-trained weights, but with LSTM and Time Distributed.
Following the previous syntax, we can now write :
1
2
3
4
5
import keras
from keras.layers import Dense, LSTM, \
    Flatten, TimeDistributed, Conv2D, Dropout
from keras import Sequential
from keras.applications.vgg16 import VGG16
1
2
3
4
5
6
7
# create a VGG16 "model", we will use
# image with shape (224, 224, 3)
vgg = VGG16(
    include_top=False,
    weights='imagenet',
    input_shape=(224, 224, 3)
)
1
2
3
4
# do not train first layers, I want to only train
# the 4 last layers (my own choice, up to you)
for layer in vgg.layers[:-4]:
    layer.trainable = False
1
2
# create a Sequential model
model = Sequential()
1
2
3
4
# add vgg model for 5 input images (keeping the right shape
model.add(
    TimeDistributed(vgg, input_shape=(5, 224, 224, 3))
)
1
2
3
4
5
6
7
# now, flatten on each output to send 5
# outputs with one dimension to LSTM
model.add(
    TimeDistributed(
        Flatten()
    )
)
1
model.add(LSTM(256, activation='relu', return_sequences=False))
1
2
3
4
# finalize with standard Dense, Dropout...
model.add(Dense(64, activation='relu'))
model.add(Dropout(.5))
model.add(Dense(3, activation='softmax'))
1
model.compile('adam', loss='categorical_crossentropy')
That gives:
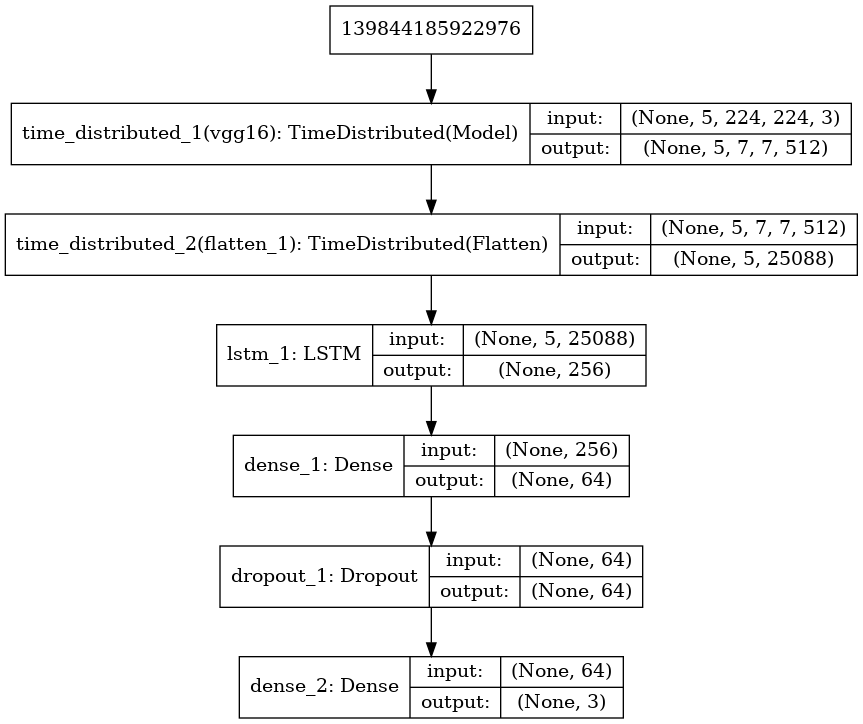
Just take a little time to notice what the diagram is showing:
-
the input take 5 images with shape (224, 224, 3)
-
we reduce shape to 5 outputs with shape (25088)
-
LSTM receives that 5 inputs
So that means that LSTM receives 5 chronological processed and flatten images as input. That’s exactly what we want!
Last words
TimeDistributed layer is very useful to work with time series data or video frames. It allows to use a layer for each input. That means that instead of having several input “models”, we can use “one model” applied to each input. Then GRU or LSTM can help to manage the data in “time”.
For sure, when the model is proven to work, it is generally advised to try to make the neural network by hand with your tensors and a lower level framework to try to have better performance. But, using Keras for *Time Distributed *layers is not a bad idea. We used it to make movement prediction and recognition, and that was (trust me) very “easy” to do.
The next article will show you a nice example that can guess which is the action that happens in a video, with a simple video frame generator.
https://medium.com/smileinnovation/training-neural-network-with-image-sequence-an-example-with-video-as-input-c3407f7a0b0f
That’s all folks!
Did you enjoy it? If so don’t hesitate to 👏 our article or subscribe to our Innovation watch newsletter! You can follow Smile on Facebook, Twitter & Youtube.