
Kong, manage your Flask APIs !

Do you think managing APIs with an interface is a time consuming task to implement ?
Not so long ago, I thought that API management was necessarily a complex task. Faced with a wide variety of tools that exist on the market nowadays, I would like to present one that can easily meet your needs. Let me show you what Kong can do for you !
Before writing this article I worked with Kong on a big platform that ingested data like Slimer a.k.a “The Ghost of John Belushi” (Ghostbusters for the youngest readers). We liked the interface provided by PGBI for Kong so we tried to create a generic platform to manage lightweight APIs with Kong and Docker and in the end, the implementation was much easier than expected.
Firstly, you need to know more about Kong, Flask and because it will also be used, Docker.

What is Kong ?
According to the official Kong website:
Kong is an API gateway. That means it is a form of middleware between computing clients and your API-based applications. Kong easily and consistently extends the features of your APIs. Some of the popular features deployed through Kong include authentication, security, traffic control, serverless, analytics & monitoring, request/response transformations and logging.
The main goal behind using Kong is to centralize the API calls, having a unique endpoint from where you can call several APIs, reducing the number of different hosts developers need to know to 1 for your whole organization.
For Flask it’s more sentimental, Flask is my madeleine de Proust for APIs, I really like to use it. It is fast and easy to install. Flask is a Python micro-framework (It is classified as a micro-framework because it does not require particular tools or libraries) created in 2004 by “Pocoo”. It is used in lots of tech stacks like Netflix, Vine, or Reddit and more — Stackshare Flask.
What is Docker ?
According to the official Docker website:
“Docker containers wrap a piece of software in a complete filesystem that contains everything needed to run: code, runtime, system tools, system libraries — anything that can be installed on a server. This guarantees that the software will always run the same, regardless of its environment.”
Set your environment up
The sources for this article are available on Github: Kong-Flask_APIs-management. You are required to install docker and docker-compose to build and run the platform. We will use curl to communicate with the platform but feel free to use your own solution.
The repository contains 3 Flask APIs with Kong and the cool dashboard made by PGBI (more information in the resources section)
Once you have cloned and installed dependencies you can run this command:
1
2
git clone git@github.com:kuty22/Kong-Flask_APIs-management.git
make
The platform can take a few minutes to install. You then need to check that all services are up to date, make ps allows you to list the platform processes:

If you want to see internal logs use
make logs
Once the platform is up, to GET these APIs that we have hidden behind Kong, we have to understand the system architecture :
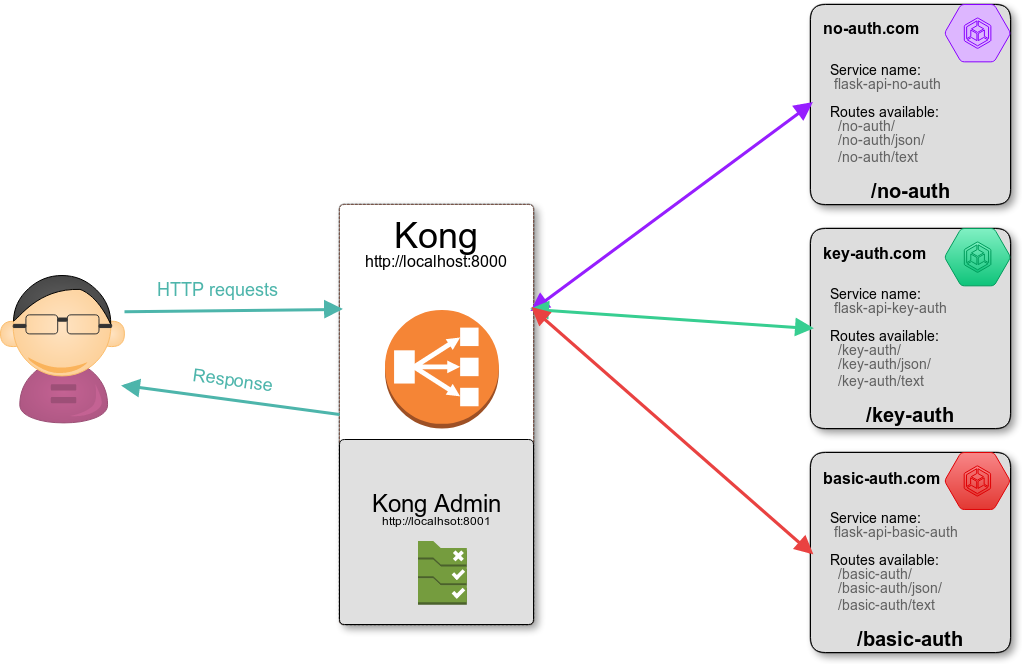
This schema represents how we want the architecture to be. With docker, it’s easier to reproduce and deploy, so it is a little different.
Why use docker?
We use Docker for a few reasons :
-
You won’t need to install anything other than Docker on your machine.
-
The installation process for a project is very easy : You will only need to run a docker run command or make, depending on how the developer likes to work.
-
Nice isolation from the host computer, meaning it’s very easy to delete everything related to project. Deleting containers and images is the only thing needed to clean your system from all the dependencies of a project.
-
If it works somewhere, it will work everywhere (As long as the good version of Docker is installed)
We also like to use Docker because it encourages you to work with a microservices architecture. According to Dzone:
Microservices architecture is an architectural style where the entire application is divided and designed as loosely-coupled, independent services modeled around a business domain.
This means that every functional block of your architecture is separated, enabling them to be developed by different teams and making them reusable in other projects.
About the platform
Because we have more than one service, we need to orchestrate the different Docker containers (Remember : one process, one service, one container). There are many solutions to address this problem, such as Kubernetes, Mesos, or Docker swarm. We chose to use docker-compose here, which is a simple tool for defining and running multi-container Docker applications because we don’t need to distribute the services over a cluster.
We used the docker-compose file proposed by Kong on their website, it works just fine.
You can find it here:
https://github.com/kuty22/Kong-Flask_APIs-management/blob/master/docker-compose.yml
I modified the official repository to remove useless services for our exercise (Nginx and Consul, more information on the Nginx website and Consul website). In our example these services only complexify the architecture.
After adding Docker and the PGBI dashboard, the architecture looks like this :

Networking and Containers:
As you can see, the architecture changed a bit after dockerizing it. Each box is now a container that provides one service.(an API, Kong, Kong’s database..)(long live containerization ! 😃).
By default docker-compose sets up a single network for your app. Each container for a service joins the default network and is both reachable by other containers on that network, and discoverable by them at a hostname identical to the container name so for instance, if the kong container needs to contact it’s postgres database, it will use its hostname, kong-database to resolve the network route.
This is very important since you will most likely use Kong as a proxy for your APIs contained in your Docker-compose app.
Back to Kong:
To be sure we understand the process to proxify an API, we’ll explore the dashboard, its features and add a new API. Then, without any browser, we’ll add a new API to Kong with a terminal .
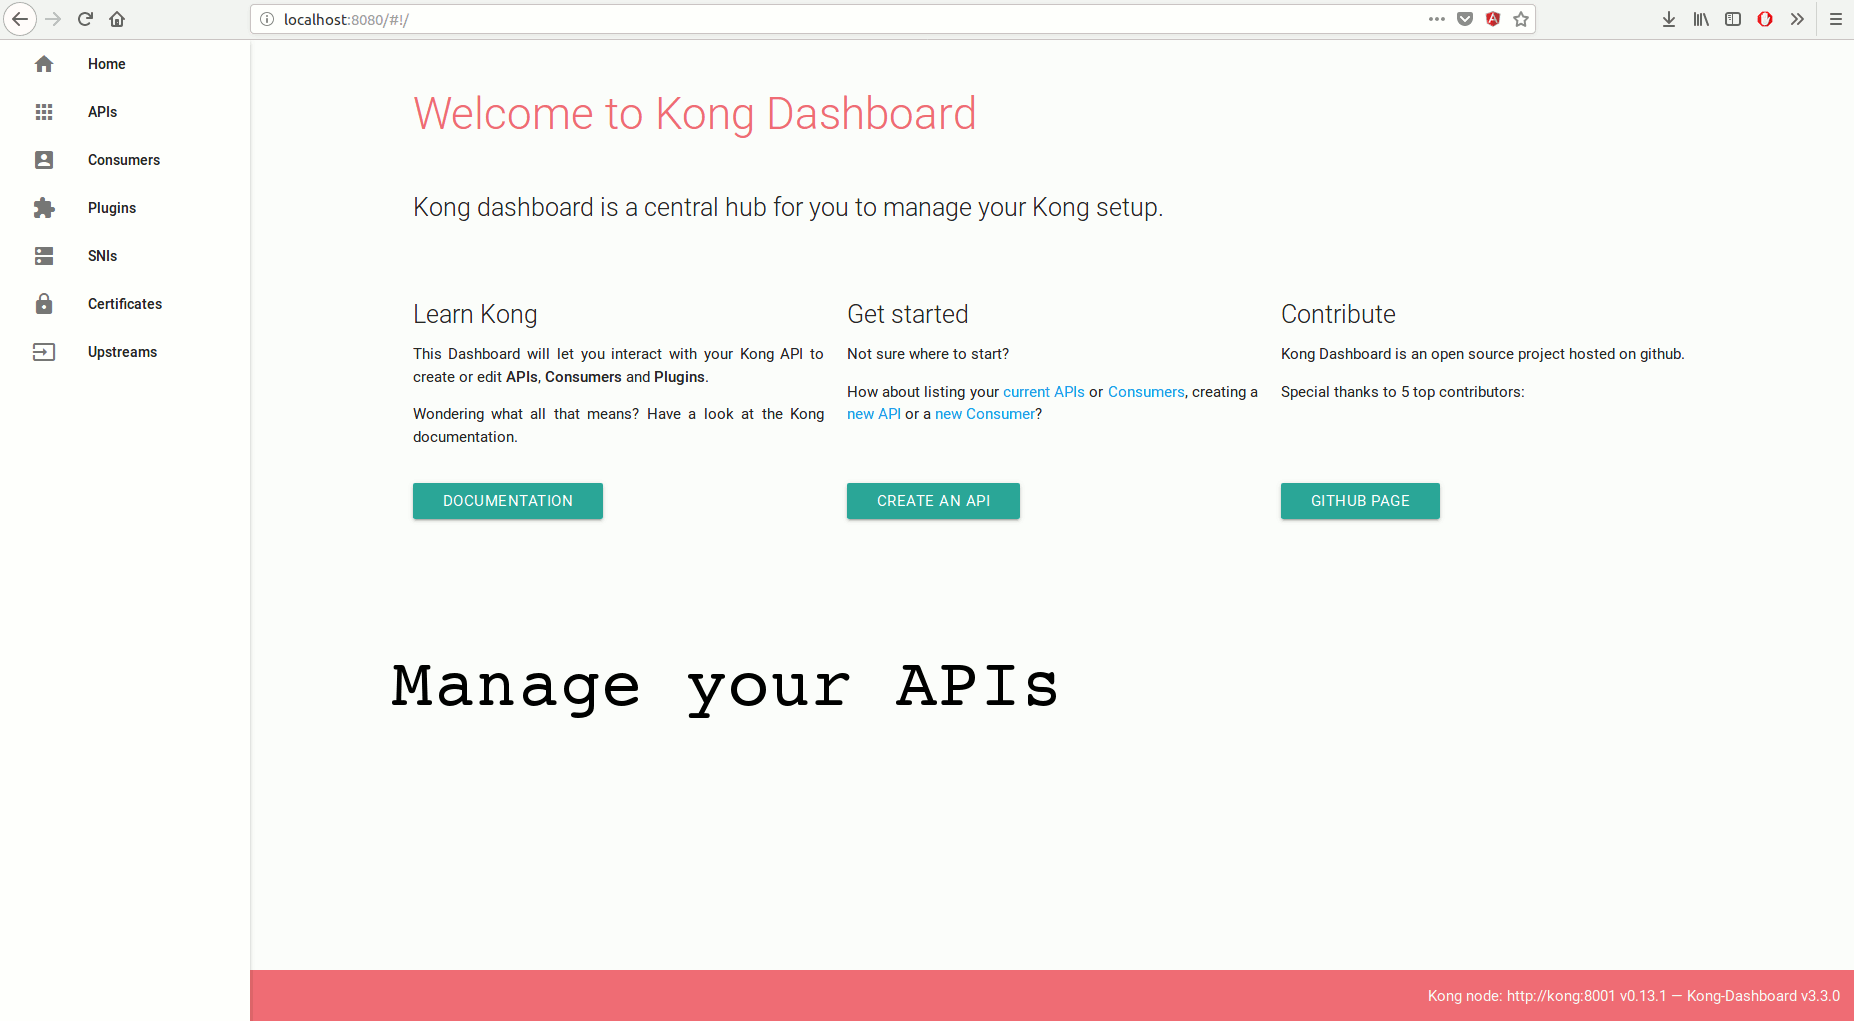
PGBI dashboard:
By default, you can find the dashboard at the url http://localhost:8080
APIs:
As you can see on the gif above, the dashboard is clear and easy to understand. To start our API implementation click on the APIs button.
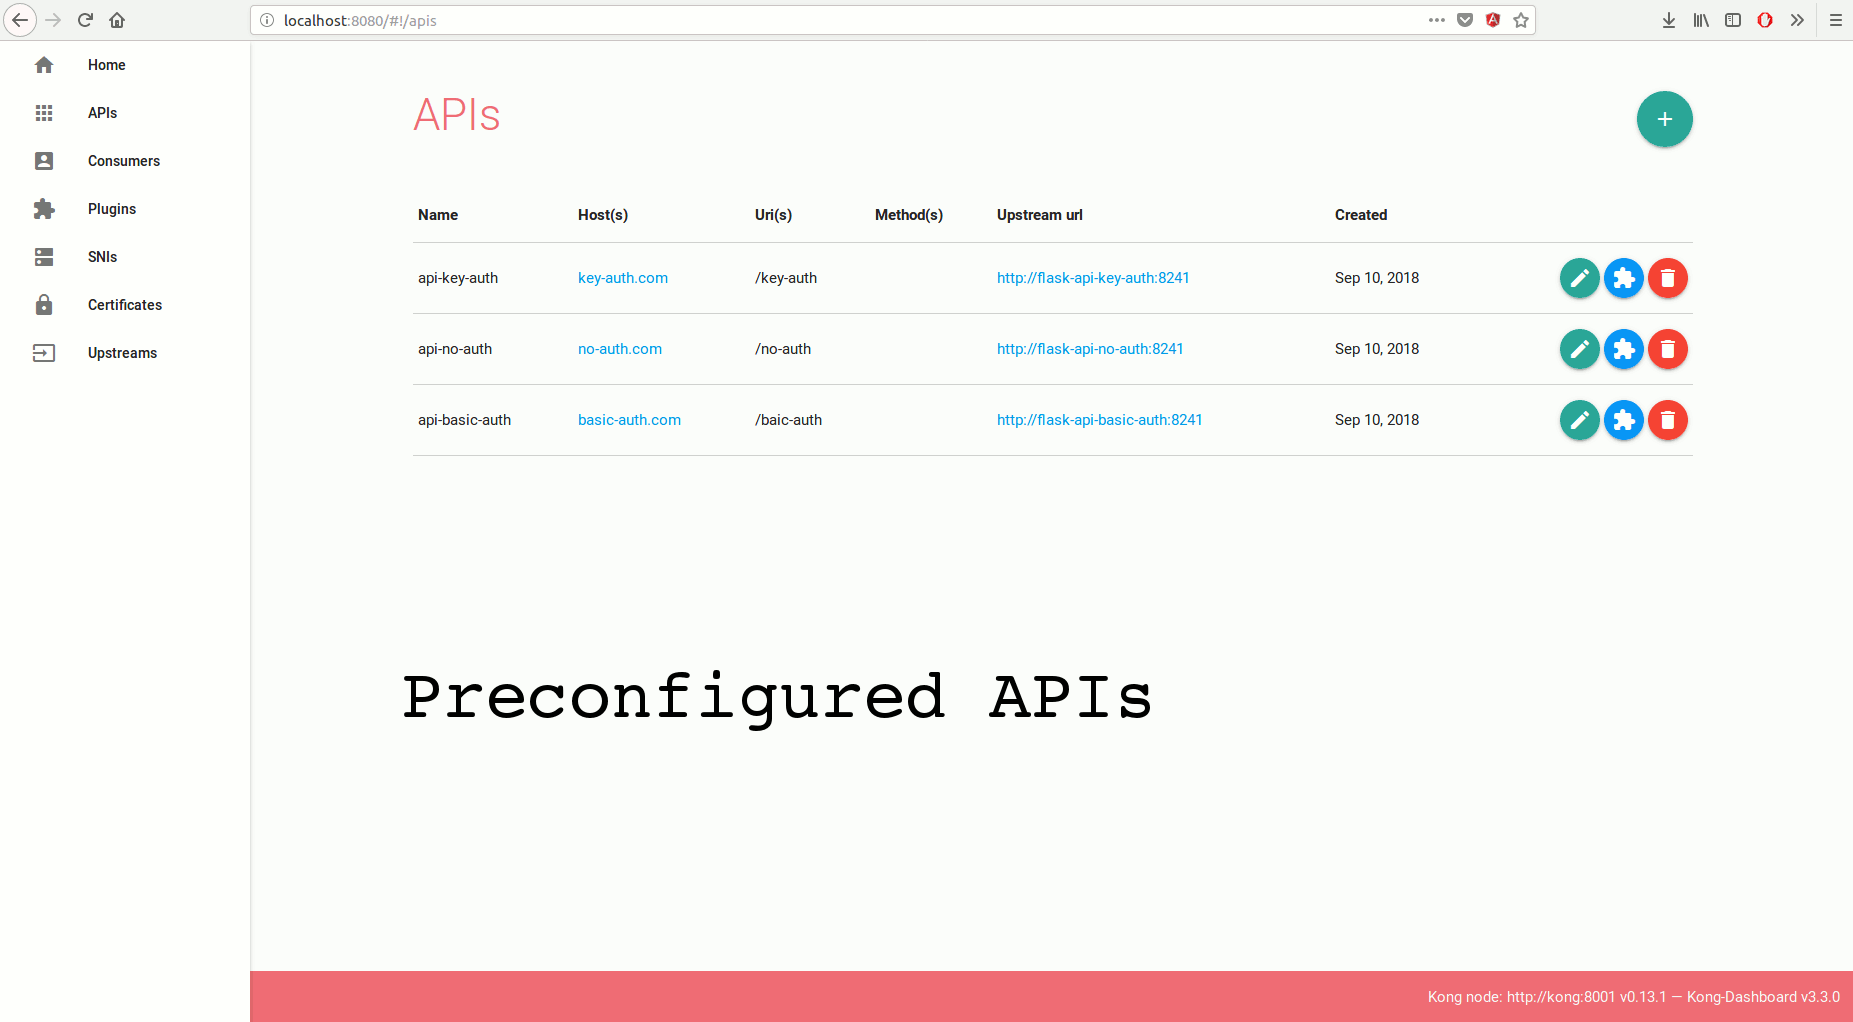
Earlier, we saw that our architecture contains 3 APIs. You can find them here. These APIs are preconfigured and the process to do it is explained below.
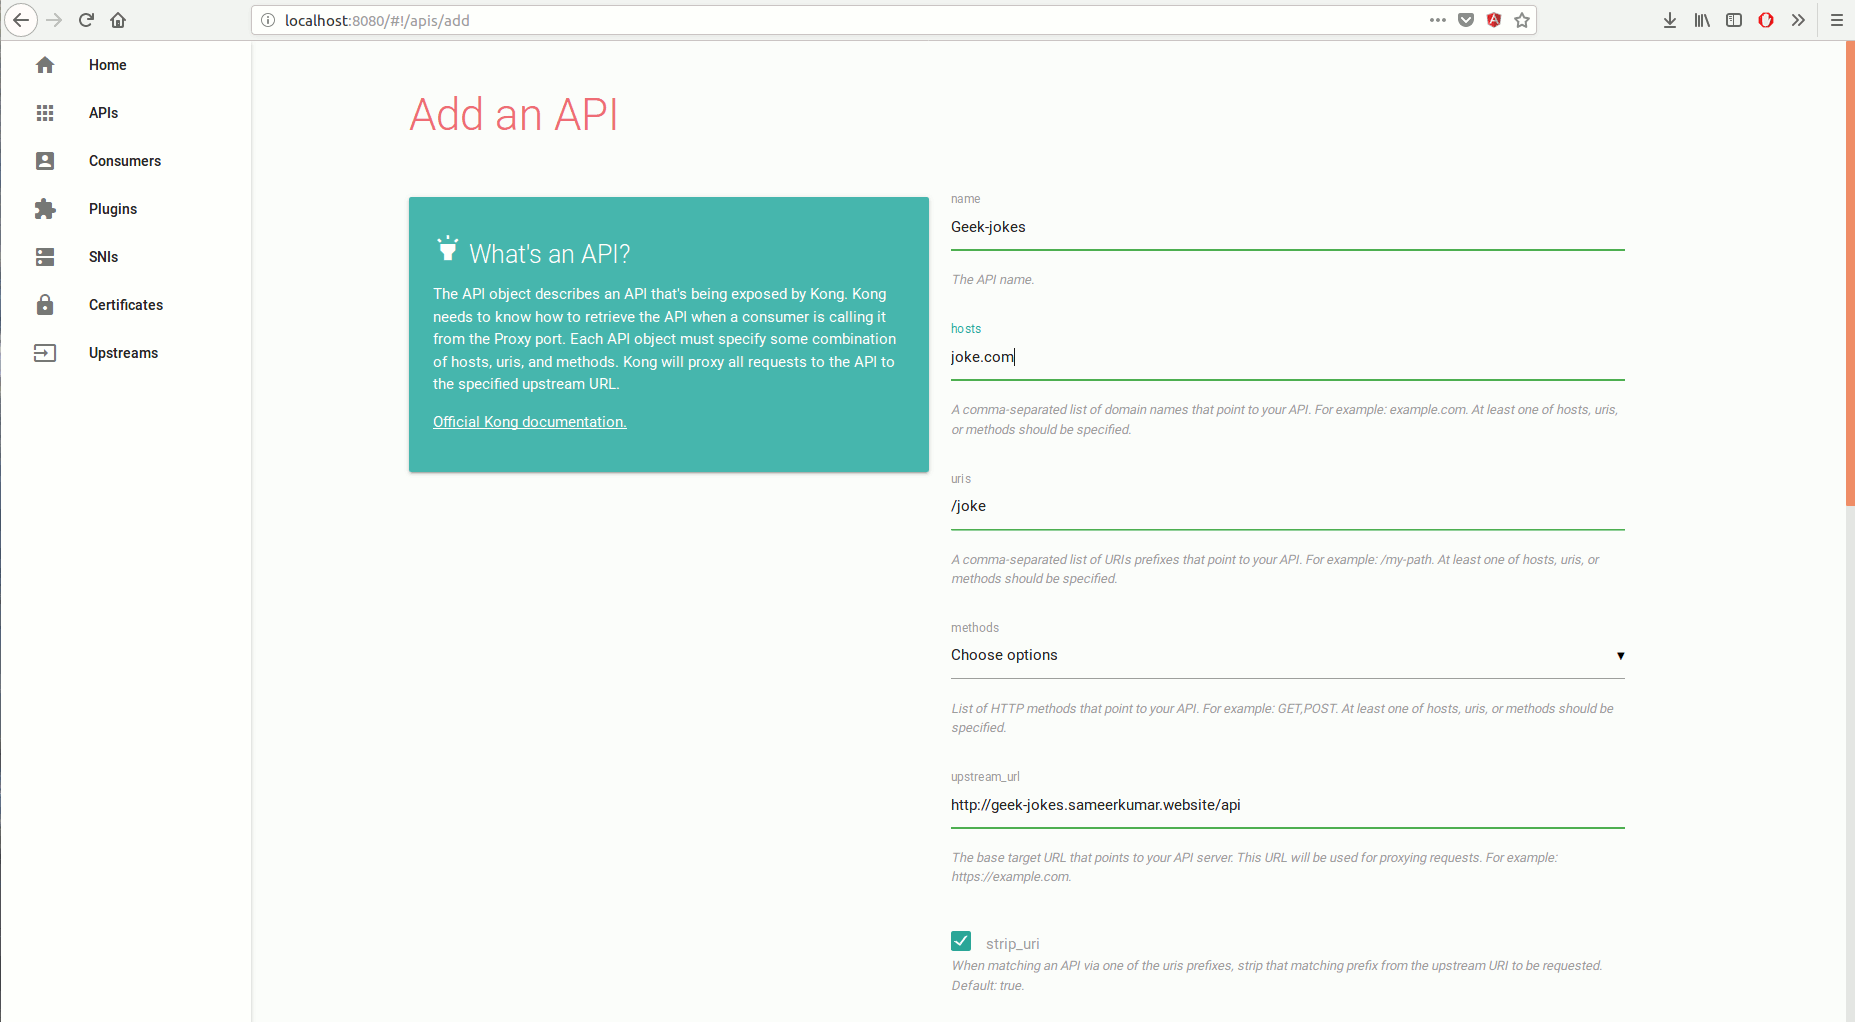
We’ll add our new API now, so let’s click on the + button and write the following configuration:
1
2
3
4
5
6
name: Geek-Jokes
hosts: joke.com
uris: /joke
methods:[all]
upstream_layout: post
canonical_url: https://geek-jokes.sameerkumar.website/api
The joke API is now accessible through our Kong. For now you can access it with a simple curl requests in a terminal:
1
$ curl -iL -X GET http://localhost:8000/joke --header "host: joke.com"
1
2
3
4
5
6
7
8
HTTP/1.1 200 OK
Content-Type: application/json
Content-Length: 99
Connection: keep-alive
Date: Mon, 17 Sep 2018 11:41:30 GMT
Set-Cookie: __cfduid=d577006014b17a4b4a634dc984802de011537124a90;
Access-Control-Allow-Origin: *
Via: kong/0.13.1
1
"Chuck Norris once shot down a German fighter plane with his finger. By yelling'Bang!'"
It’s not really secure to do it like that, because everybody can access it. The solution to add security is key authentication. Key-based authentication is a kind of authentication that may be used as an alternative to password authentication. Instead of requiring a user’s password, it is possible to confirm the client’s identity by using asymmetric cryptography algorithms, with public and private keys. (more information here)
We’ll add a new key authorization to get this url.
Consumers:
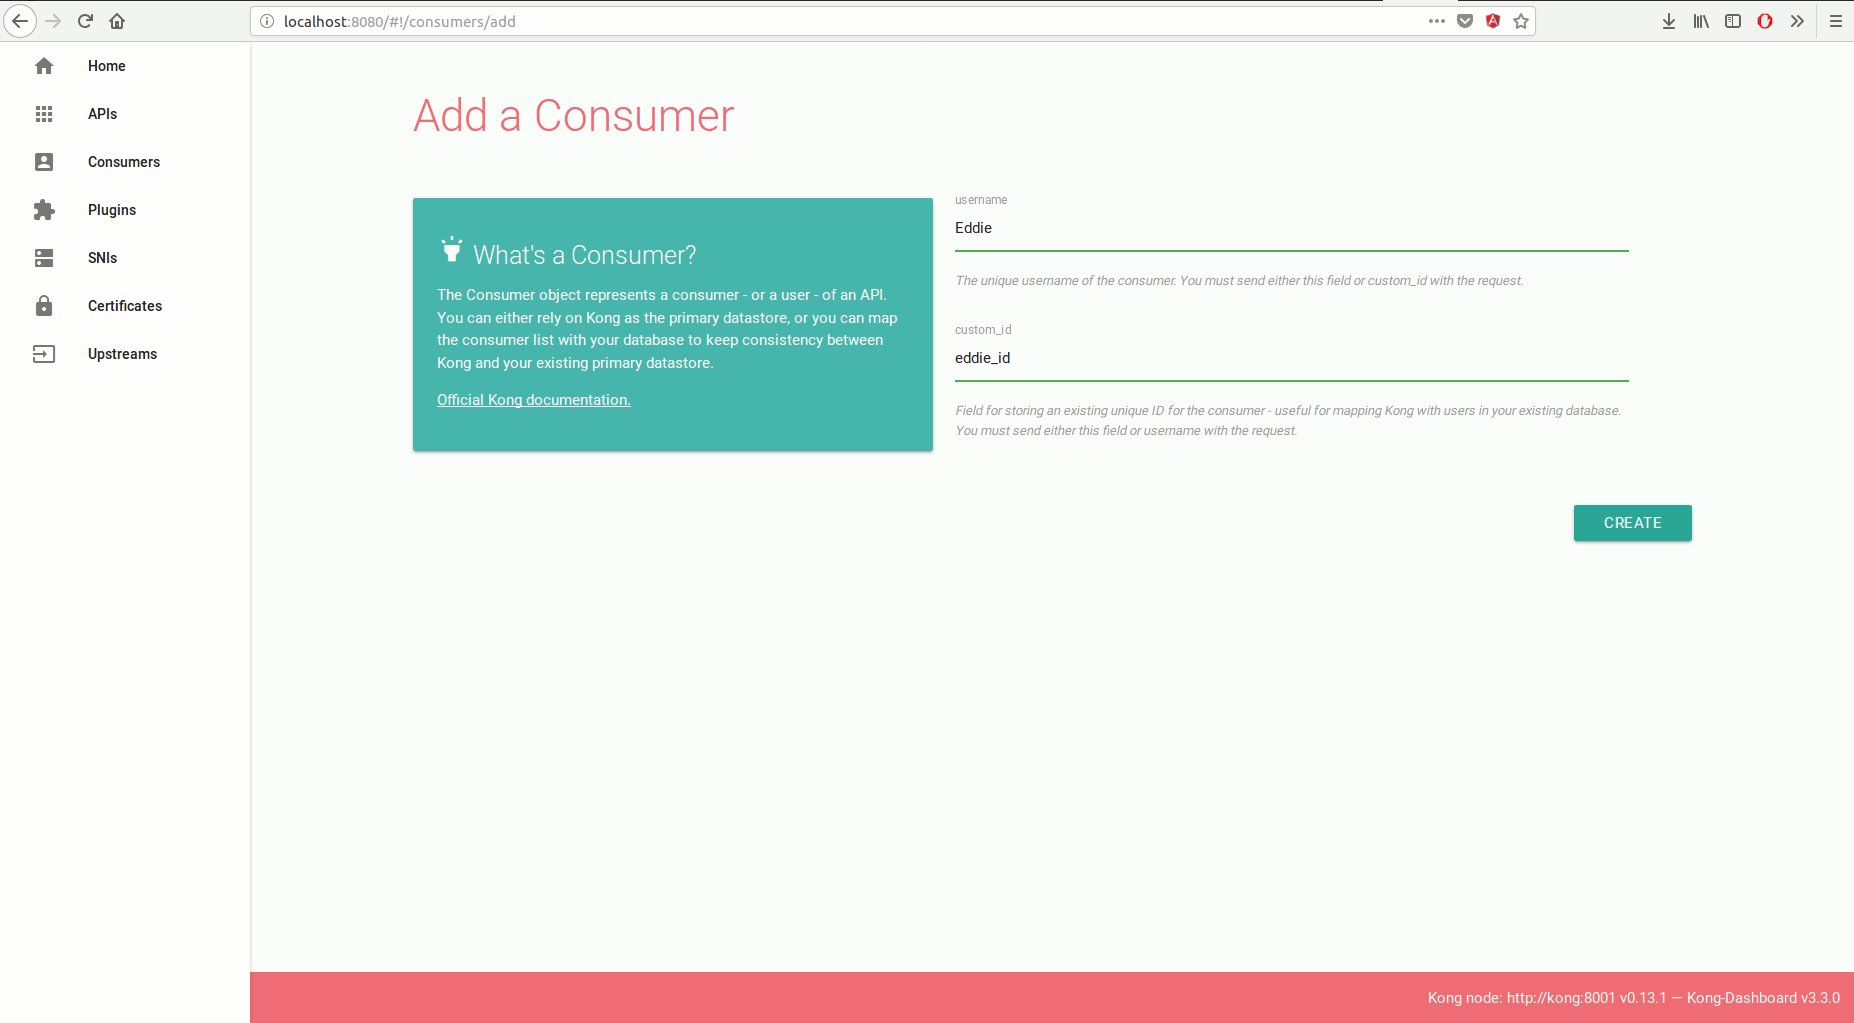
To add new consumers, return to the home page (*http://localhost:8080) *click on the consumer button then follow the steps below.
We add a specific User for our API, the key authorization is a plugin which is linked to an API, this plugin requires user credentials.
-
Create consumer (The user that will access the API)
-
Add key auth credentials to the consumer previously created.

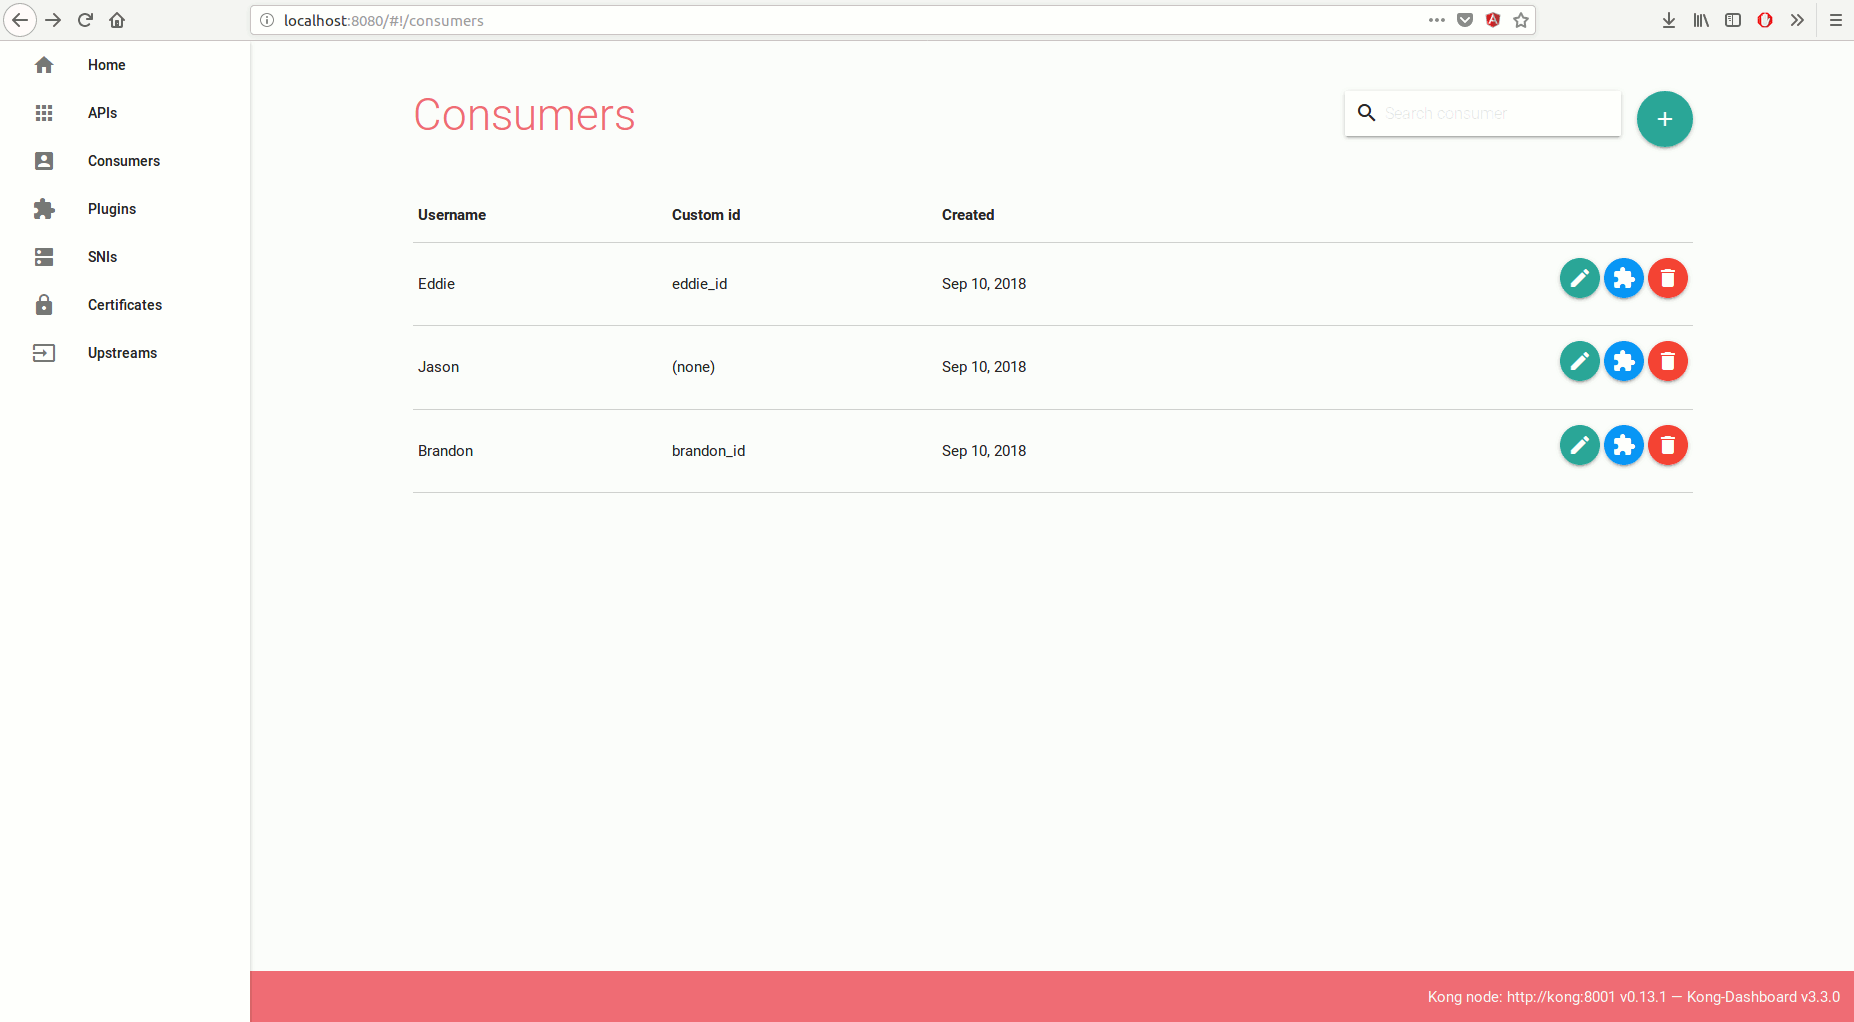
In the consumer page, you can see Jason and Brandon, our users already preconfigured. But for the moment, Eddie must be created to protect our API joke. We cannot protect our APIs without consumers. Kong is designed this way because it would be useless to add protection without consumers.
1
2
consumer name : Eddie
consumer_id: eddie_id (optional)
Eddie is almost ready to help us. We have to edit him, then add his credentials. Return on the consumers page (http://localhost:8080/#!/consumers/) :
Once our credentials are created, there is still one thing missing : We must specify to Kong that the API is protected by key authentication and only Eddie can access it.
1
key: eddie_secret_key
Plugins:
To specify a type of authentication, we must add a plugin to our API.
To add a plugin, return on the APIs’ home page (http://localhost:8080/#!/apis), click on the plugin button like below:
The API is now secured. When I try the same request as before, I’m not able to reach the API endpoin:
1
$ curl -iL -X GET  --url http://localhost:8000/joke   --header 'Host: joke.com'
1
2
3
4
5
6
7
HTTP/1.1 401 Unauthorized
Date: Mon, 17 Sep 2018 11:47:50 GMT
Content-Type: application/json; charset=utf-8
Transfer-Encoding: chunked
Connection: keep-alive
WWW-Authenticate: Key realm="kong"
Server: kong/0.13.1
1
{"message":"No API key found in request"}
This request is blocked because our API now needs a key. On the previous steps we added a user with a key so let’s try its key to request our API.
1
curl -iL -X GET  --url http://localhost:8000/joke   --header 'Host: joke.com' --header "apikey: eddie_secret_key"
1
2
3
4
5
6
7
8
9
10
11
12
13
HTTP/1.1 200 OK
Content-Type: application/json
Content-Length: 118
Connection: keep-alive
Date: Mon, 17 Sep 2018 11:50:56 GMT
Set-Cookie: __cfduid=d577006014b17a4b4a634dc984802de011537124a90; expires=Tue, 17-Sep-19 11:50:55 GMT; path=/; domain=.sameerkumar.website; HttpOnly; Secure
Access-Control-Allow-Origin: *
Via: kong/0.13.1
Expect-CT: max-age=604800, report-uri="https://report-uri.cloudflare.com/cdn-cgi/beacon/expect-ct"
Server: cloudflare
CF-RAY: 45bb5ba5888b3c3b-CDG
X-Kong-Upstream-Latency: 1050
X-Kong-Proxy-Latency: 0
1
"Chuck Norris does not need to type-cast. The Chuck-Norris Compiler (CNC) sees through things. All way down. Always."
Our API Geek-jokes is now protected thanks to Eddie and his key-auth.
Recap of the different steps:
-
Add our API
-
Create a user
-
Create credentials for this user
-
Create a plugin for our API
With these steps, you can add all APIs you want in Kong, but in a automation process, we want to add them without individual steps. To avoid human actions, it is easy. In our case, all configurations are set by curl requests.
The next part of this article will list the different steps to add an API with the manual request then we’ll see how to automate all of that.
Without Dashboard
Now that we have a joke api to laugh in our free-time, how about adding an API to generate random profiles? It can be useful to dynamize tests (example: If my website needs unit tests, I’ll call this API to generate randomly a user).
About the api Uinames:
The Uinames API returns JSONP data over HTTPS requests with name, surname, gender, and region. Extra data includes age, title, phone, birthday, email, password, credit card, expiration, number, pin, and security. (API page)
This time you only need your terminal.
API configuration:
1
2
3
4
5
name: Profile-generator
hosts: profile-generator.com
uris: /gen-profile
methods:[all]
upstream_url: http://uinames.com/api/
- Add a new API to your Kong:
1
2
3
4
5
curl -i -X POST --url http://localhost:8001/apis/  \
    --data 'name=Profile-generator' \
    --data 'uris=/gen-profile' \
    --data 'hosts=profile-generator.com' \
    --data 'upstream_url=http://uinames.com/api/'
Once you have run this command, you will find a new API registered on your dashboard. For this second example, we don’t create a new user because the platform was initialized with already two users with their own credentials.
Brandon is a user already declared in the platform, and he can protect our API with a basic authentication (Basic authentication requires only a username and a password). For adding a new basic-auth to your consumer, it is the same process as adding credentials, but this time choose basic-auth type.
- Add a plugin to your new API:
1
curl -i -X POST --url http://localhost:8001/apis/Profile-generator/plugins/  --data "name=basic-auth"  --data "config.hide_credentials=true"
1
2
3
4
5
6
7
HTTP/1.1 201 Created
Date: Mon, 24 Sep 2018 06:41:40 GMT
Content-Type: application/json; charset=utf-8
Transfer-Encoding: chunked
Connection: keep-alive
Access-Control-Allow-Origin: *
Server: kong/0.13.1
1
{"created_at":1334771301000,"config":{"hide_credentials":true,"anonymous":""},"id":"5eb02c71-8vc3-4db3-b1f9-2db134fef012","name":"basic-auth","api_id":"ab9ad4x7-x0a9-465e-af99-874a71132260","enabled":true}
This plugin protects your API, it is now impossible to request the profile generator without basic-auth.
By default, when a plugin is registered, its status is “activated”.
For our example, a consumer is already registered as Brandon. He has a basic-auth registered as indicated in the Kong documentation.
1
curl -iL http://localhost:8000/gen-profile/    --header 'host: profile-generator.com' --header 'Authorization: Basic QWxhZGRpbjpPcGVuU2VzYW1l'
1
2
3
4
5
6
7
8
9
10
11
12
HTTP/1.1 200 OK
Content-Type: application/json; charset=utf-8
Transfer-Encoding: chunked
Connection: keep-alive
Date: Mon, 24 Sep 2018 07:49:45 GMT
Server: Apache
X-Powered-By: PHP/5.4.45
Access-Control-Allow-Origin: *
Access-Control-Allow-Methods: GET
X-Kong-Upstream-Latency: 377
X-Kong-Proxy-Latency: 0
Via: kong/0.13.1
1
{"name":"Osman","surname":"Əbdülzadə","gender":"male","region":"Azerbaijan"}
Why this Basic token ?
The authorization header must be base64 encoded. For example, if the credential uses
Aladdinas the username andOpenSesameas the password, then the field’s value is the base64-encoding ofAladdin:OpenSesame, orQWxhZGRpbjpPcGVuU2VzYW1l.
Then the
Authorization(orProxy-Authorization) header must appear as:
Authorization: Basic QWxhZGRpbjpPcGVuU2VzYW1l
(By the way, Kong team, it’s Ali Baba that says “Open Sesame” ;) )
How to avoid human tasks ?
In the platform I made for this article (available on github), you may have seen the preregistered APIs (no-auth.com, key-auth.com, and basic-auth.com). These APIs are pre-registered to easier run the example, and also for the good practices.The fact is automating your process can help a lot, scripting human tasks and failed strategies is more efficient.
The registration of our APIs is scripted in the kong entrypoint.sh file. You can find it in the Kong folder:
1
2
3
4
5
project/kong/$ tree
.
├── containerpilot.json
├── Dockerfile
└── entrypoint.sh
This file will be executed once the Kong service is up. When you are inside the kong container, two methods are available to request it.
-
With localhost:
http://localhost:8001 -
With docker network:
http://kong:8001
These 3 API registrations are a good start to make your own protected api platform. Feel free to create, edit and connect new APIs to better understand the architecture and how kong works.
To conclude:
I enjoyed working with Kong, it is an excellent solution and the surrounding community is pretty huge (it’s a very good indicator for open source projects).
The API management groups much more need than just proxying APIs. Use cases are manifold and even if Kong misses a native and integrated dashboard, it is fast to implement and lightweight. Furthermore, Mashape, the historical company at the head of the kong idea, provides 2 other solutions (not open source 😫). These 2 solutions exist to complete the API needs:
-
Gelato: Developer API documentation portal, allow you to create a full documentation platform for developers and administrators of your APIs.
-
Galileo: The Analytics Platform for APIs, Microservices and Serverless Software. This software allows you to add realtime-logging, improve your API debugging, propose a dashboard for monitoring your APIs.
With this full stack of technologies, all API management needs are covered.
To improve your possibilities with kong take a look at the documentation to find many features to manage your APIs.
Co-writer : Seiji Schoch
Sources: Github
Resources
-
Geek joke API (ProgrammableWeb)
-
Kong Dashboard (Ui, by Pierre “ PGBI”)
Have you enjoyed it ? If so don’t hesitate to 👏 our article or subscribe to our Innovation watch newsletter ! You can follow Smile on Facebook, Twitter & Youtube.