
SageMaker : Bring your own Algorithms

With the help of Docker, you will be able to customize training and infering models using other frameworks that those provided by SageMaker
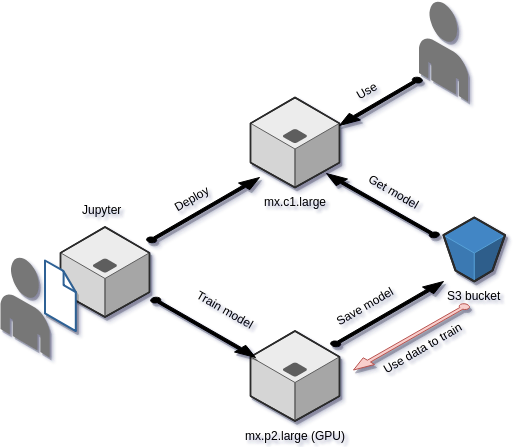
You may already know what Amazon SageMaker is. We can name it as “Machine Learning as a Service” providing Jupyter notebook, Python API to launch model training on huge servers with CPU or GPU, then store model and data on S3. Finally deploy and serve that model with a REST API. In order to help you, SageMaker provides several built-in models and frameworks like MXNet, Tensorflow, …
To play fair, you may be able to train models with built-in for many cases. But one day, like me, you will face some dead end. In my case, that was the use of Keras with a generator, using some Python packages and wanted to tweak my service. But don’t panic, Amazon takes care of you and allows you to create your own environment.
And thanks to SageMaker using Docker!
Yes, Docker one more time! Really, SageMaker starts Docker container on an instance to have a working environment suitable for your needs. If you use the built-in frameworks, SageMaker provides the right Docker image without the need to specify it. But when you want your own, it’s easy to build, push and use it.
Create Docker image
You may want to go taking a look at SageMaker’s “examples” Github page. In the “advanced” section, there are several “bring_you_own” directories where Docker is used. That’s a good start to grab informations.
https://github.com/awslabs/amazon-sagemaker-examples/tree/master/advanced_functionality
We will prepare our environment by creating that directory structure.
1
2
3
4
5
6
7
8
9
10
11
12
13
14
15
16
17
sage
├── Dockerfile
├── local_test
│  ├── predict.sh
│  ├── train.sh
│  ├── serve.sh
│  └── test_dir => /opt/ml in container
│      ├── input
│      │   ├── config
│      │   └── data
│      │       └── training
│      ├── model
│      └── output
└── program
    ├── (some scripts...)
    ├── train
    └── serve
The Dockerfile can be built from any base image, but if you plan to use your own GPU and AWS “p2” instances, I strongly advise to use:
1
FROM nvidia/cuda:9.0-base-ubuntu16.04
Note: *you will need to manage CPU and GPU usage and if you want to use Nvidia GPU on your own computer you will need *nvidia-docker (https://github.com/NVIDIA/nvidia-docker)
Not to mention, it’s a bit difficult to switch from CPU to GPU while you will use the same image to train and serve. When you’re testing, you will probably use “tensorflow-gpu” package and need a “p2” instance that has GPU. But, when you will deploy the image on an “m4” instance, there will be no GPU and the package will raise an error (because it cannot find any GPU). You must use the “tensorflow” package instead. So, what I did is to detect if the “import” of tensorflow raises an exception. If it does, I uninstall “tensorflow-gpu” and install “tensorflow” at the Docker container startup. It results in a few more seconds to start up the instance, but this “hack” is working perfectly fine in this scenario. I’m pretty sure there are other ways to do it, feel free to comment if you have one in your mind.
Then, install all necessary packages to use CUDA from the Dockerfile:
-
cuda-command-line-tools-9–0
-
cuda-cublas-dev-9–0
-
cuda-cudart-dev-9–0
-
cuda-cufft-dev-9–0
-
cuda-curand-dev-9–0
-
cuda-cusolver-dev-9–0
-
cuda-cusparse-dev-9–0
-
libcudnn7=7.0.5.15–1+cuda9.0
-
libcudnn7-dev=7.0.5.15–1+cuda9.0
Afterwards, you may install other packages like Python, wget, zip and so on. Then you may use “pip” to install Python packages as Keras, Tensorflow-gpu, numpy, and so on…
You should not **give CMD command in your Dockerfile, but you should set PATH environment to the directory where you copied program directory inside the image. In that directory resides train and serve scripts **that are launched by SageMaker when you “train” the model, and when you want to “deploy” it.
So, do that:
1
2
3
ENV PATH=/program:${PATH}
ADD program /program
RUN chmod +x /program/train /program/serve
Our serve script launches Flask server, you need to create HTTP routes to /ping and /invocations, the last one is used to infer (reads predict). Moreover, /ping should check if the model is loaded and respond “200 OK” if everything is working fine. Keep in mind that AWS will ping each second this endpoint, so we need to load the model in memory one time for all.
To get a better picture on how it works, you can refer to https://github.com/awslabs/amazon-sagemaker-examples/blob/master/advanced_functionality/scikit_bring_your_own/container/decision_trees/serve that is a good starting point to create WSGI application (see wsgi.py and predictor.py) — you will be able to change “predictor.py” script to adapt on your own needs.
Because I’m using Keras with TensorFlow, I needed to manage the fact that one model is served on several processes:
1
2
3
class ScoringService(object):
    model = None # Where we keep the model when it's loaded
    graph = None
1
2
3
4
5
6
7
8
    @classmethod
    def get_model(cls):
        if cls.model is None:
            cls.model = load_model(
                  os.path.join(model_path, 'model.h5'))
            cls.model._make_predict_function()
            cls.graph = K.get_session().graph
        return cls.model
1
2
3
4
5
    @classmethod
    def predict(cls, input):
        clf = cls.get_model()
        with cls.graph.as_default():
            return clf.predict(input)
So, now, I can build the Docker image
1
docker build -t sagemaker-test .
Prepare Docker image and test your code on your computer
We need to prepare the Docker image and also test it prior using it on SageMaker. It would be sad to waste time starting a training that will not succeed, and it would be difficult to find the problem on remote instances. Docker has the advantage of allowing to use an almost identical functional environment on your development computer than on production, so let’s take advantage of it.
The goal here: train a little subset of data to check if model compiles, we will try to serve API on the next section.
When using an AWS instances, some directories are mounted from S3 where we have uploaded our “train data”, to /opt/mlon the instance.
Locally, we’ll need to mount our own directory to /opt/ml. Inside our directory structure, we’ve created test_dir and we need to pay attention that :
-
/opt/ml/input/trainingis where your training data resides -
/opt/ml/input/configis where hyperparameters.json resides — on a local instance we’ll need to create it ourself, but with SageMaker “estimator” we’ll pass that parameter asdict. SageMaker will write it for us. -
/opt/ml/modelis where the model is written, on SageMaker that model will be archived as tar.gz file and uploaded on your S3 bucket -
/opt/ml/outputcan be use to write output (error, info…)
Note that training is in fact the name of the “channel” used when we’ll launch training step from SageMaker, we may add test and validation channels, and so we need to create that directories and use them. But for now, let’s keep it simple.
So, I duplicate my training data inside local_test/test_dir/input/training and the following command to launch Docker container (you may save that in local_test/train.sh):
1
docker run --rm -v $(pwd)/test_dir:/opt/ml sagemaker-test train
You can notice the “train” command passed to Docker container, it will call /program/train inside the container.
Our “train” python script can now use /opt/ml/input/data/training to read data, and train the model. Then write the model file in /opt/ml/model/model.h5. And voilà !
Now that the image is ready, let’s test it locally
Starting by creating whatever we want to respond to /ping and /invocations endpoints via HTTP, we need to check content type, data size, … but we only need those endpoints. In order to get a lazy loading of our model, we test in the “ping” call if it exist, and load it if necessary. By doing so we also implementing a smart health-check for SageMaker (cf. previous ❡)
Again, I advise to take a look to the examples given by SageMaker to find how to customize to your own needs.
Ok, now it’s time to try (by save the following CLI in local_test/serve.sh)
1
docker run --rm -v $(pwd)/test_dir:/opt/ml -p 8080:8080 sagemaker-test serve
It will mount local directories exactly the same way as in the “train” stage, but now using “serve” (which is the /program/serve script).
Indeed, you can use whatever ports mapping, it’s up to you 😉.
And now, make a test!
We can use the requests package from a python script, or simple curl call to ping http://127.0.0.1:8080/ping and call http://127.0.0.1:8080/invocations (POST call).
Now, let’s push it to AWS SageMaker
We’re now ready to train much more data, build the model, save it on S3 and serve our API from AWS instance. The only thing we need to do this, is to push your image on ECR and our training data on S3.
The following build_and_push.sh script can work for all projects:
https://github.com/awslabs/amazon-sagemaker-examples/blob/master/advanced_functionality/scikit_bring_your_own/container/build_and_push.sh
You put this script in your project, then call it by passing the image name as parameter :
1
./build_and_push.sh sagemaker-test
It will push something like $*{account}.dkr.ecr.${region}.amazonaws.com/sagemaker-test:latest *on Amazon Docker image repository. That image can now be instantiated to build the model and serve API.
In order to use a specific version of the image, I edit the script to remove the “latest” tag.
On SageMaker you can now create a Jupyter notebook and start a new estimator:
After training is done, the model is archived in the S3 location you provided. You can now deploy it:
1
2
predictor = tree.deploy(initial_instance_count=1,
    instance_type='ml.m4.xlarge')
That will create the following items (you can check them on the SageMaker dashboard and tweak them if necessary):
-
a configuration endpoint — this configuration refers to the image you are using, and the model location to load (in
/opt/ml...) -
an endpoint that uses the configuration to starts an instance that launches your Docker image as a container and run the “serve” script.
If the /ping endpoint returns an error (model is not loaded, a problem with port binding, …) the instance is killed and you can check errors in Jupyter notebook or through the CloudWatch interface.
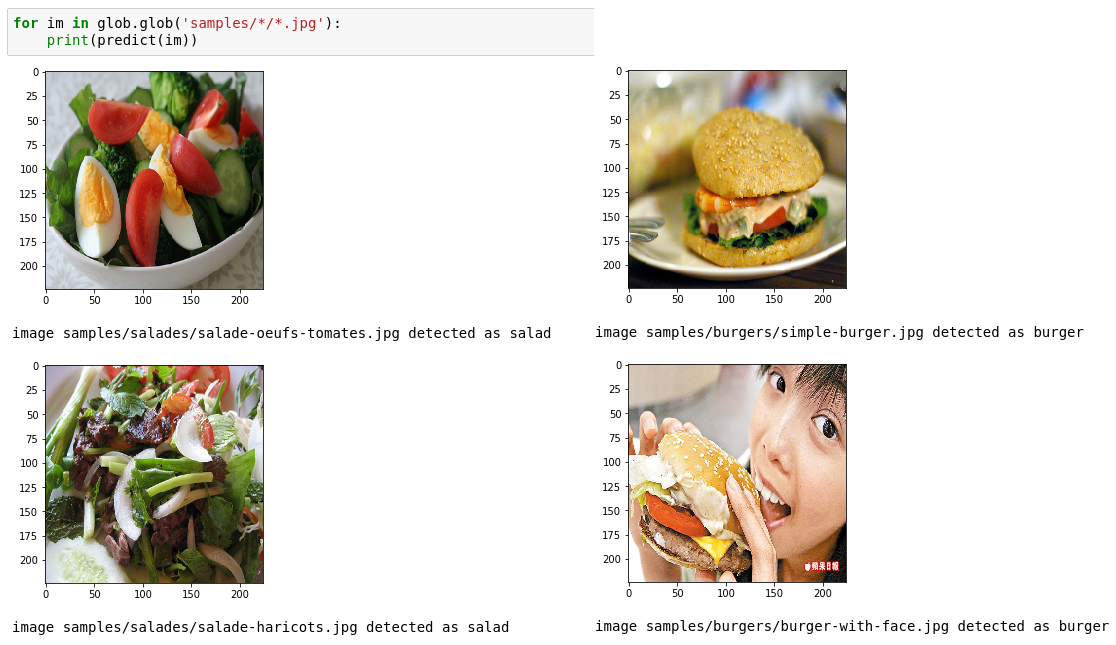
Ok, now, let’s make a test. Try to predict something:
1
2
res = predictor.predict(some_data)
print(res)
That should:
-
use any serializer if you needed one to send data to API
-
call the
/invocationsendpoint on your instance -
return the prediction
Using our API outside the notebook
This is pretty simple, the only thing we need is to create an “Estimator”, and we can do it inside or outside SageMaker interface (on Raspberry Pi, on our laptop…):
Of course, that API is not **public **so you need to be authenticated to AWS with a correct user (or in a group). This snippet works in Jupyter and in a distant computer as soon as you setup AWS configuration (install awscliand useaws configure to create ~/.aws/config file)
Winding up
So, what we can reflect on? Amazon SageMaker got several good points:
-
it has efficient built-ins to create a model and train it on a huge server with or without GPU
-
it provides Jupyter notebook to launch train, services and test the model
-
it also provides a really useful “sagemaker” python package with many classes and function to ease the work
-
we can use our own Docker image to customize the environment, training phase, API service, or using other frameworks, … as far as we follow the “train” and “serve” requirements. We can use OpenCV HAAR detection and make our own “train” script that saves XML model, use OpenCV to load that model and responds to clients, and, why not, use another language like Go or PHP to serve our API, awesome !
-
We can also get models from your S3 bucket and use them outside SageMaker, so that means that we could use SageMaker to only train your model.
Downsides
-
We need to manage CPU and GPU separately if we want to use the same image to train and serve on different instances (or locally with or without GPU), and that means that we’ll need to “hack” something to remove “tensorflow-gpu” and install “tensorflow”. There are others ways to do it I didn’t explored, like using tagged images and change the termination endpoint configuration. I didn’t checked how SageMaker standard images manage this, but if anyone of you did, please tell us in comments 😉.
-
On paper, you don’t need to create your own Docker image for Keras, but I didn’t successfully found a way to install our specific configuration of OpenCV . That’s OK in Jupyter designing phase, but not on training and inference instances. Keep in mind that our Jupyter notebook is not the “train” script that is launched on the training instance.
-
I didn’t find other way to change the entry point with *Estimator *as we can do with built-ins models. SageMaker built-ins allow to code a bundled script that is used to train and serve the model, but with our own Docker image, this is two scripts (
trainandserve) we need to insert in image, and we didn’t found how to make it tweakable from Jupyter— that means each image is built for a certain kind of environment, and you only can try to tweak it with hyperparameters. Maybe I’m doing something wrong. I’ll check that point later.
At Smile we using SageMaker for many large CNN to build and train and we appreciate fact that Amazon allows Docker usage to setup environment. If you have interest in computer vision, for projects or to work with, feel free to reach us at dir-innovation@smile.eu.
Did you enjoyed it ? If so don’t hesitate to 👏 our article or Subscribe to our Innovation watch newsletter ! You can follow Smile on Facebook, Twitter & Youtube.